
Corn Dog Muffins
I think this may officially go down as the very best kid food item I have ever made. I have always loved corn dogs, and my kids love them too. I love the idea of making them at home, but I don't have a deep fryer, and I have no intention of getting one. So when I came across this idea of making corn dog muffins I just knew we had to have it. It's super easy - basically just good homemade cornbread with a piece of hot dog. Cooking in the oven as muffins means no mess from frying, and I loved that I could make different size options using different size muffin pans and cutting the hot dogs.
I think this may officially go down as the very best kid food item I have ever made. I have always loved corn dogs, and my kids love them too. I love the idea of making them at home, but I don't have a deep fryer, and I have no intention of getting one. So when I came across this idea of making corn dog muffins I just knew we had to have it. It's super easy - basically just good homemade cornbread with a piece of hot dog. Cooking in the oven as muffins means no mess from frying, and I loved that I could make different size options using different size muffin pans and cutting the hot dogs. I have a great corn bread recipe that I love - it's adapted from this recipe, with a few changes to make it the way I like it (I changed the oil to butter and reduced the sugar). It's just right - buttery, and just a little sweet. The touch of sweetness worked perfectly with the salty hot dogs.

Ingredients for the corn bread:
1 1/2 cups medium or coarse ground cornmeal
2 1/2 cups milk
2 cups unbleached white bread flour
1 tablespoon baking powder
1 teaspoon salt
1/2 cup sugar
2 eggs
1/2 cup melted butter, (cooled slightly so it doesn't cook your eggs)
And you'll need a package or two of good quality hot dogs. I only buy the Applegate brand.
Directions:
Preheat oven to 400 degrees F (200 degrees C). In a small bowl, combine cornmeal and milk; let stand for at least 5 minutes (longer is better).
Grease your pans with your preferred oil. I have a coconut oil spray that I like, butter would be great too. Or use muffin papers or silicon cups and then greasing won't be necessary.
In a large bowl, whisk together flour, baking powder, salt and sugar (if you use honey, mix that with the wet ingredients instead. Mix the eggs and butter in with the milk and cornmeal, and then combine the wet and dry ingredients. Mix until smooth. Spoon it into your prepared muffin cups to about 3/4 full.
Cut your hot dogs to the size you want and stick them in the center of each muffin cup.
Bake in preheated oven for 15 - 30 minutes until golden brown (depending on size of muffin - 15-20 for minis, 25-30 for big ones, just watch and make sure they don't get too brown), or until a knife inserted into the center of the cornbread comes out clean.
Notes:
Medium or coarse ground cornmeal is a must in this recipe. I tried it once with a finer grind and it was too heavy and dense. I usually buy Bob's Red Mill medium grind.
Soaking the cornmeal in the milk also makes a huge difference, the recipe calls for 5 minutes, I think longer is even better.
The original recipe for cornbread made one 9x13 inch casserole pan. I think this ends up with about 2 dozen standard size muffins, or more/less depending on size.
This recipe works great with gluten free flour!
I have not tried this with whole wheat flour. I think it would be pretty dense. But I am curious to try. Although I'm a big believer in everything in moderation, so I don't mind a little white flour in some cornbread occasionally.
I think you could easily substitute honey for the sugar, maybe just reduce the milk by a little.
Let them cool a little and pop them out of the pans, and serve with some good organic ketchup and/or yellow mustard. I of course had to make a double recipe because we love leftovers - and these things are so good that there would have been no leftover if I hadn't made lots extra. I've packed them in school lunches, and I've put a bunch in the freezer for another day.
And - next time you're making a big pot of soup or chili or stew, make up a batch of this cornbread without the hot dogs - it comes together pretty quick for a weeknight side.
Let me know what you think!

Pancake muffins
I love a good cooking shortcut - or I guess we call them "hacks" these days. So here is one of my favorite breakfast hacks: muffins made from pancake batter.

Muffins made from pancake batter? Yes! It totally works.

When I make pancakes I always make extra batter.
If you look at my breakfast for lunch posts, you'll see that we make a lot of lunches with leftover pancakes. Pancakes refrigerate well and freeze great and they are a perfect item to have on hand for quick and easy breakfasts and lunches.
But sometimes I get about halfway through the batter and I'm just feeling done with standing over the stove and cooking pancakes.
So I take the rest and just make muffins!
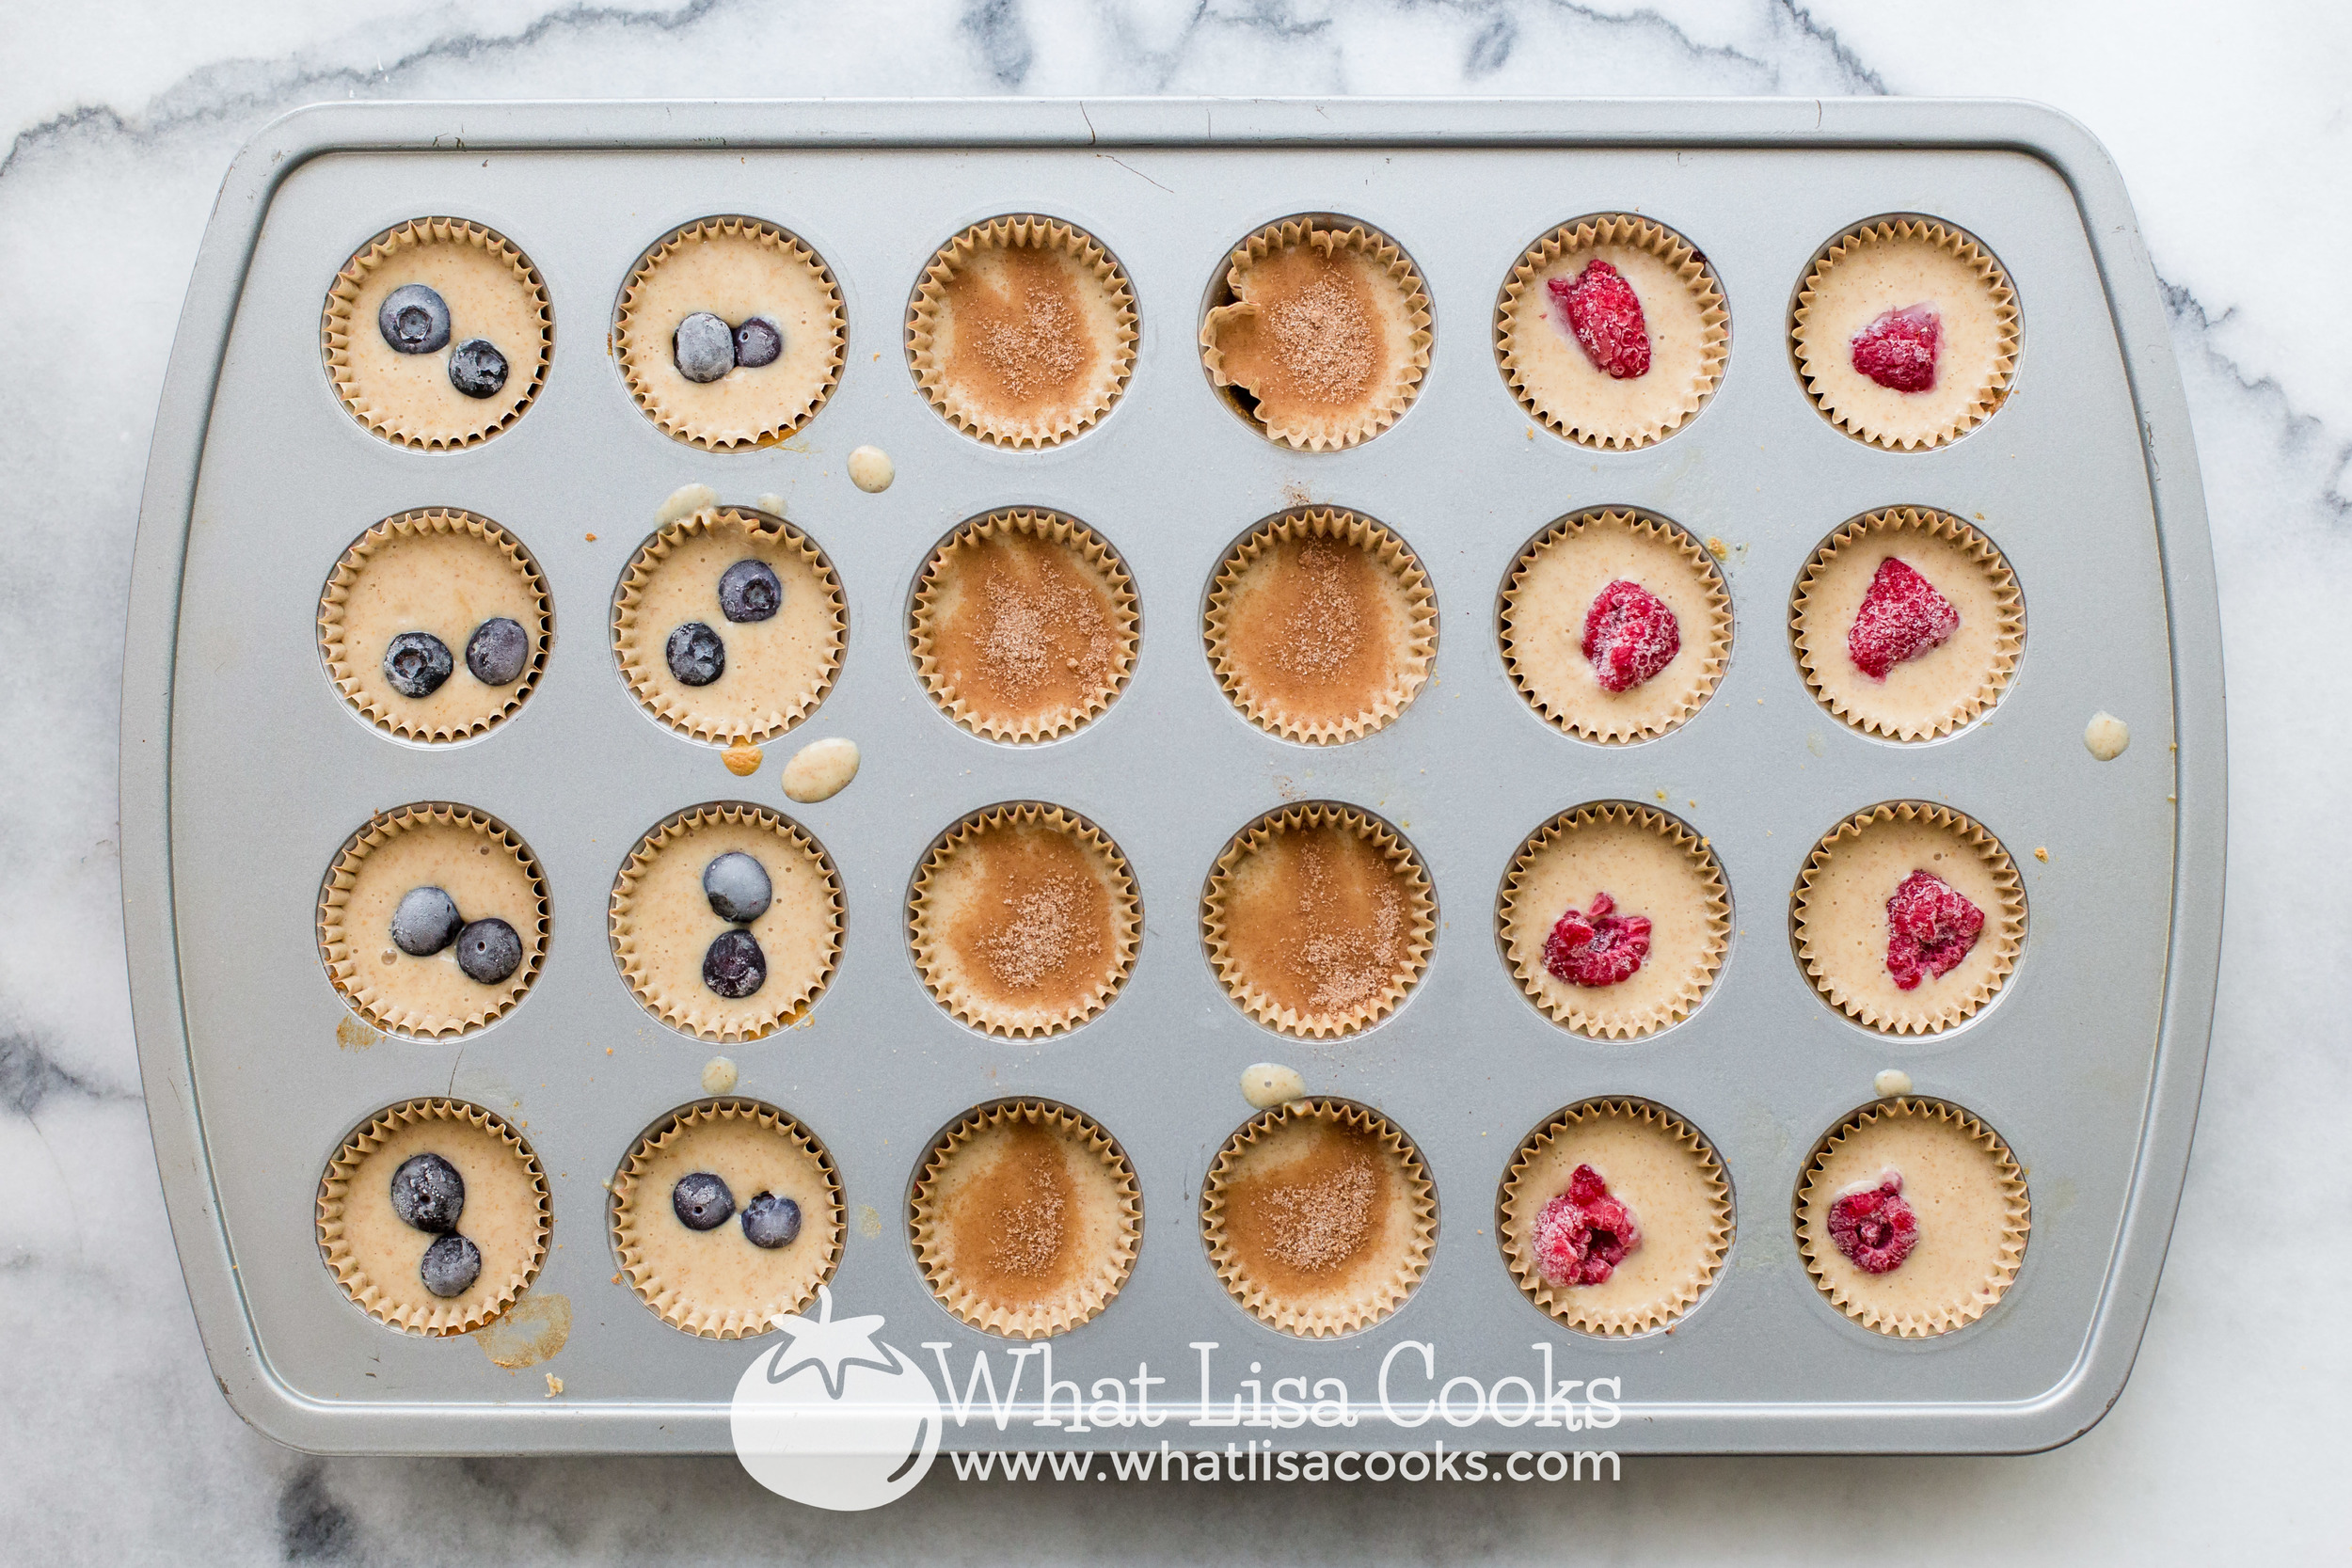
All you do is fill greased (or paper lined) mini muffin pans with the batter and then top as you like.
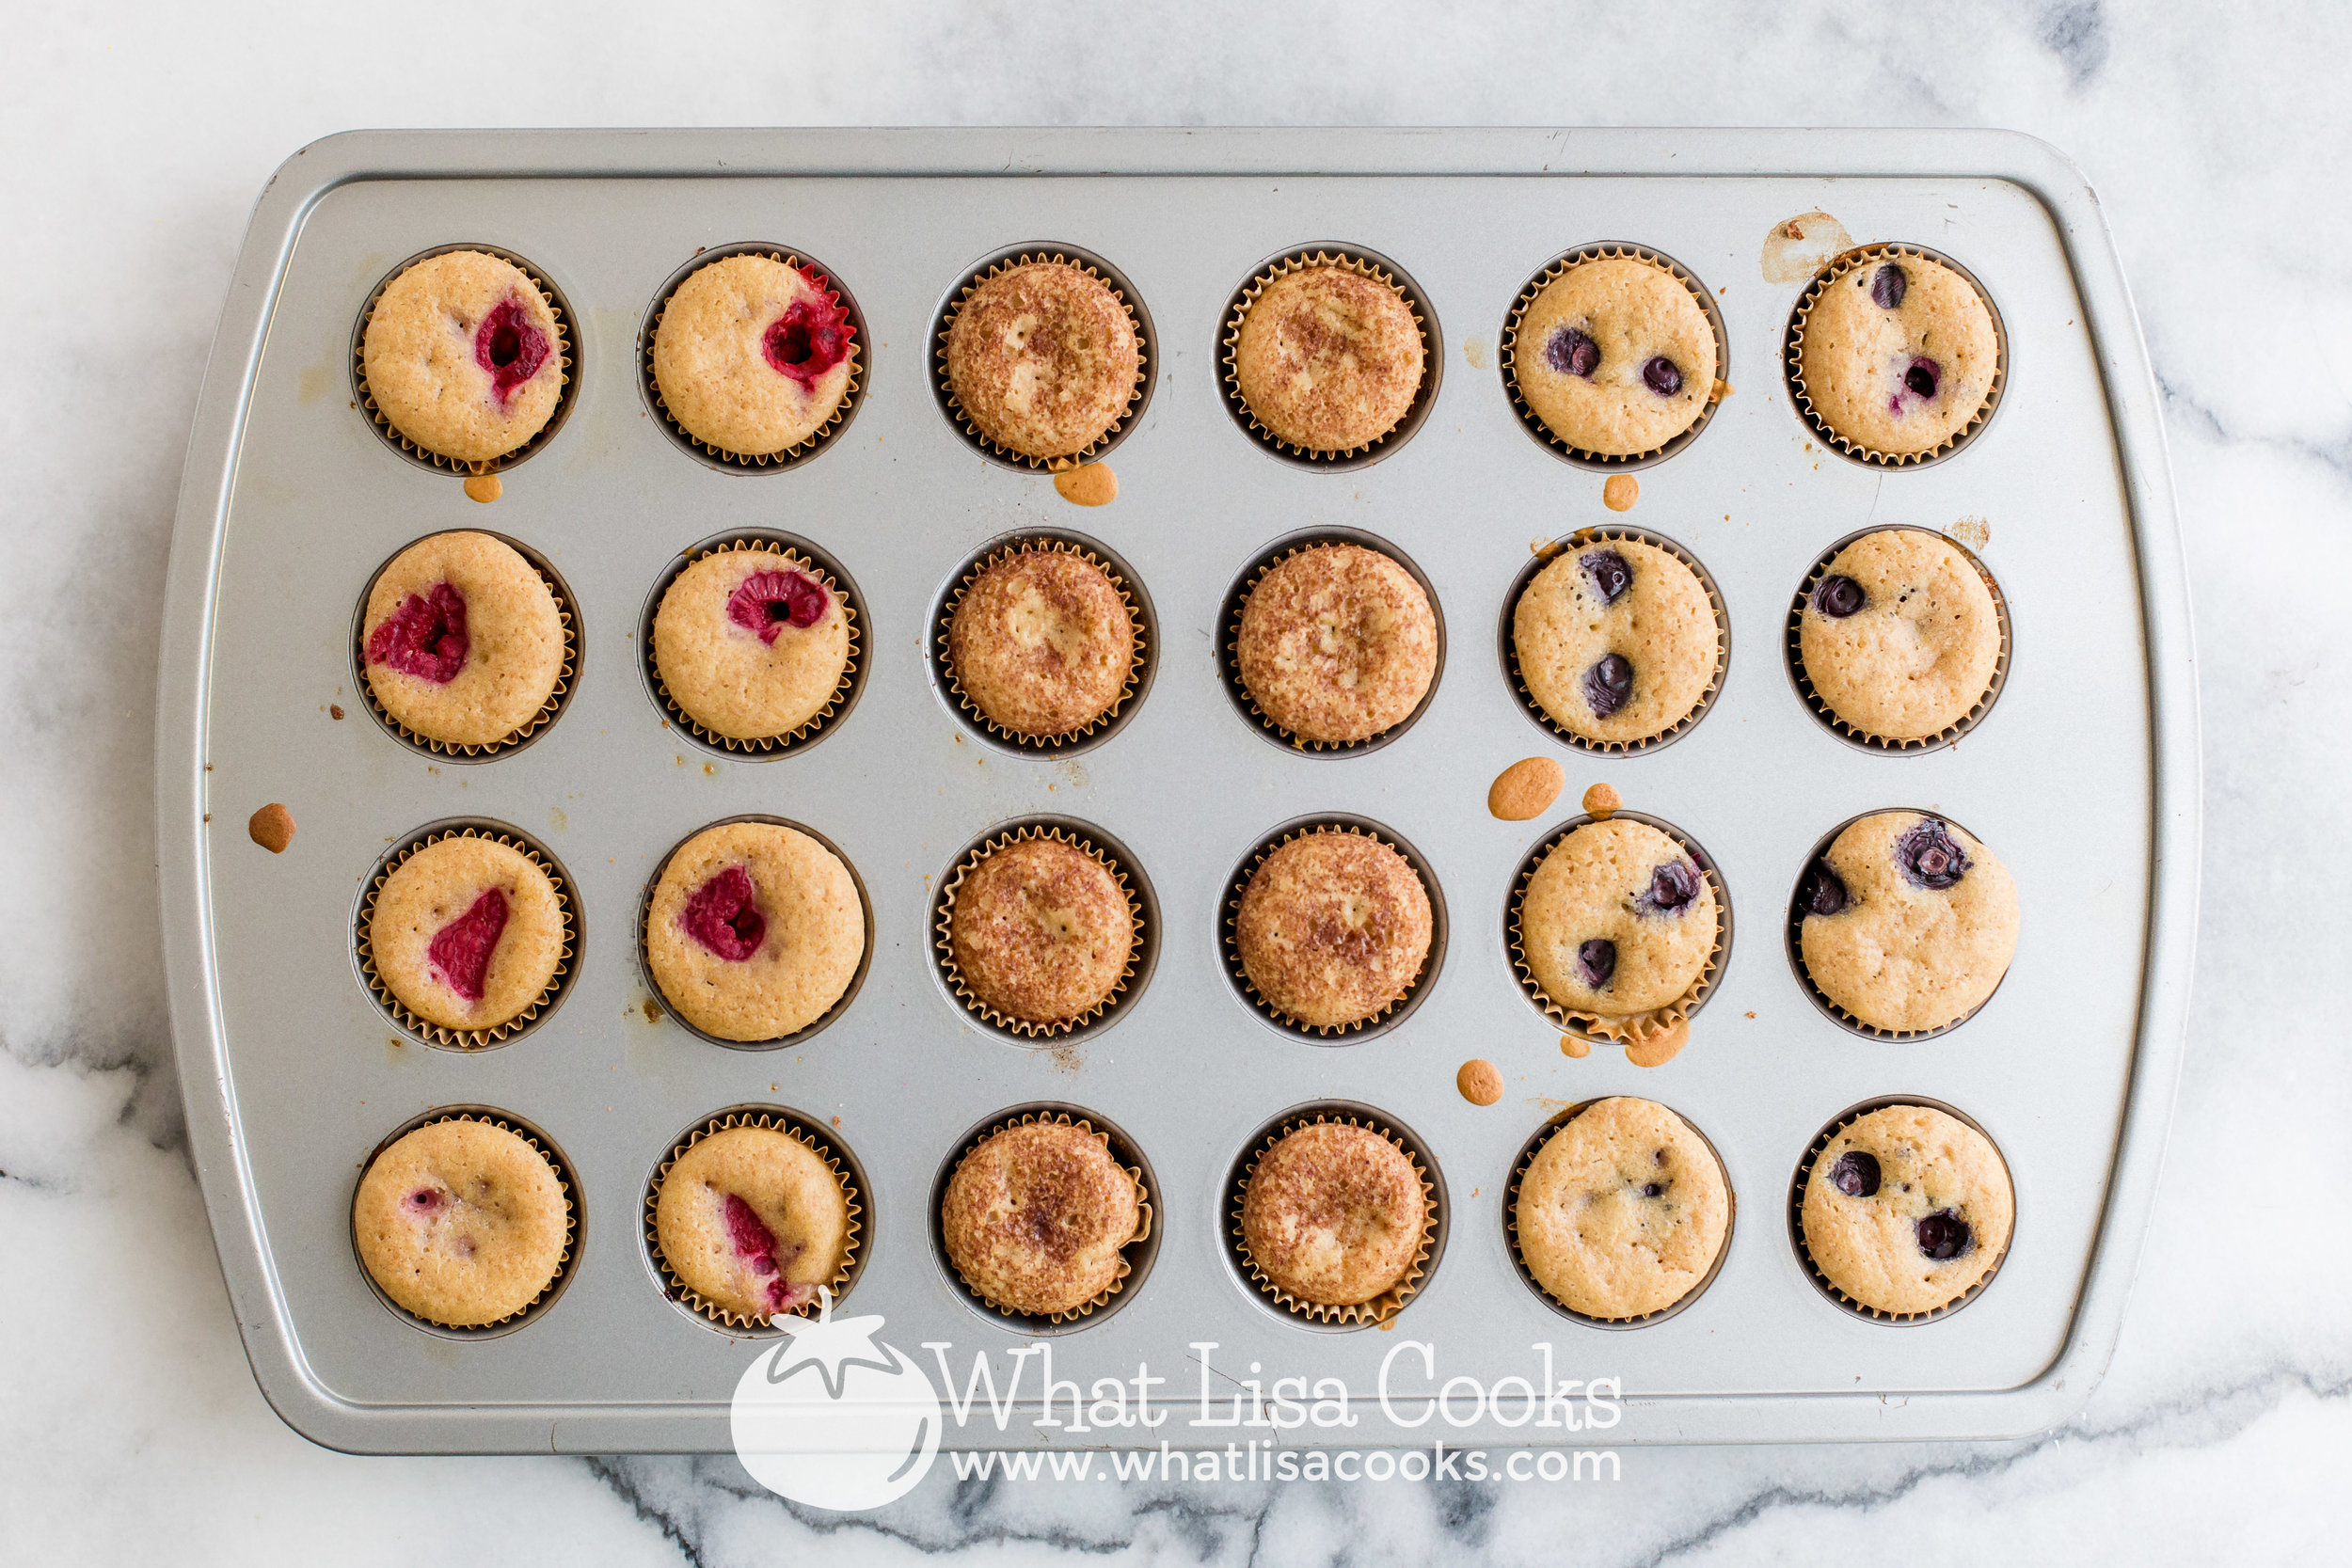
These work best with mini muffin pans because pancake batter is lighter than regular muffin batter, so bigger muffins fall a little and don't look quite as pretty. But bite sized pancake muffins are perfect. You can make them plain, or you can dress them up. I like to fill all the spots with batter, and then add stuff to the top.
In this batch you can see that I did three different flavors. I put a couple of blueberries in some, a big frozen raspberry in the middle of some, and the rest I just sprinkled with a little cinnamon sugar.
They are so good - light and moist and just perfectly sweet enough. They are the perfect size for little hands and small enough to just pop in your mouth, and they make a great portable breakfast.

As for the pancake recipe - I make my own. Pancakes are so easy to make from scratch, it's almost silly. You can read my pancake recipe here. You'll note in my recipe that I say that the butter is optional, but I think it's necessary for muffins - it really helps to keep them from sticking. If you don't want to take the time to melt and cool butter, I've substituted vegetable oil for the butter and they still come out great.
You can totally do this with a store bought pancake mix if you prefer, I would just gently suggest that you try to find one with no artificial ingredients. For extra tasty pancakes, I always add a little maple syrup to the batter. This makes them taste great on their own, which means that for a quick weekday breakfast or lunch you don't need to get out all that sticky syrup.
Pancake Muffins
Mixed pancake batter (be sure to include the butter or oil, and add a little extra sweetener)
oil of choice for muffin pans, or muffin cups
mini muffin pan
toppings / fillings of choice: berries, chocolate chips, cinnamon & sugar, etc.
Preheat oven to 350, or 325 convection. Grease mini muffin pans, or line with muffin papers.
Prepare your pancake batter as usual. Be sure to include the butter or oil called for in the recipe, and add a little extra sweetener. I usually sweeten my pancake batter with maple syrup. My recipe calls for enough syrup to make the batter nicely sweet without needing to add extra syrup when you eat them. But if you're using a different recipe, or a box mix, I would recommend that you add a few tablespoons of extra syrup or sugar.
Fill your muffin cups about half way with pancake batter. Add toppings as desired - a piece of fruit, a frozen berry, a little sprinkle of cinnamon sugar. Bake for about 15 minutes for mini muffins (time will vary depending on your oven temperature).
Enjoy!
~ Lisa

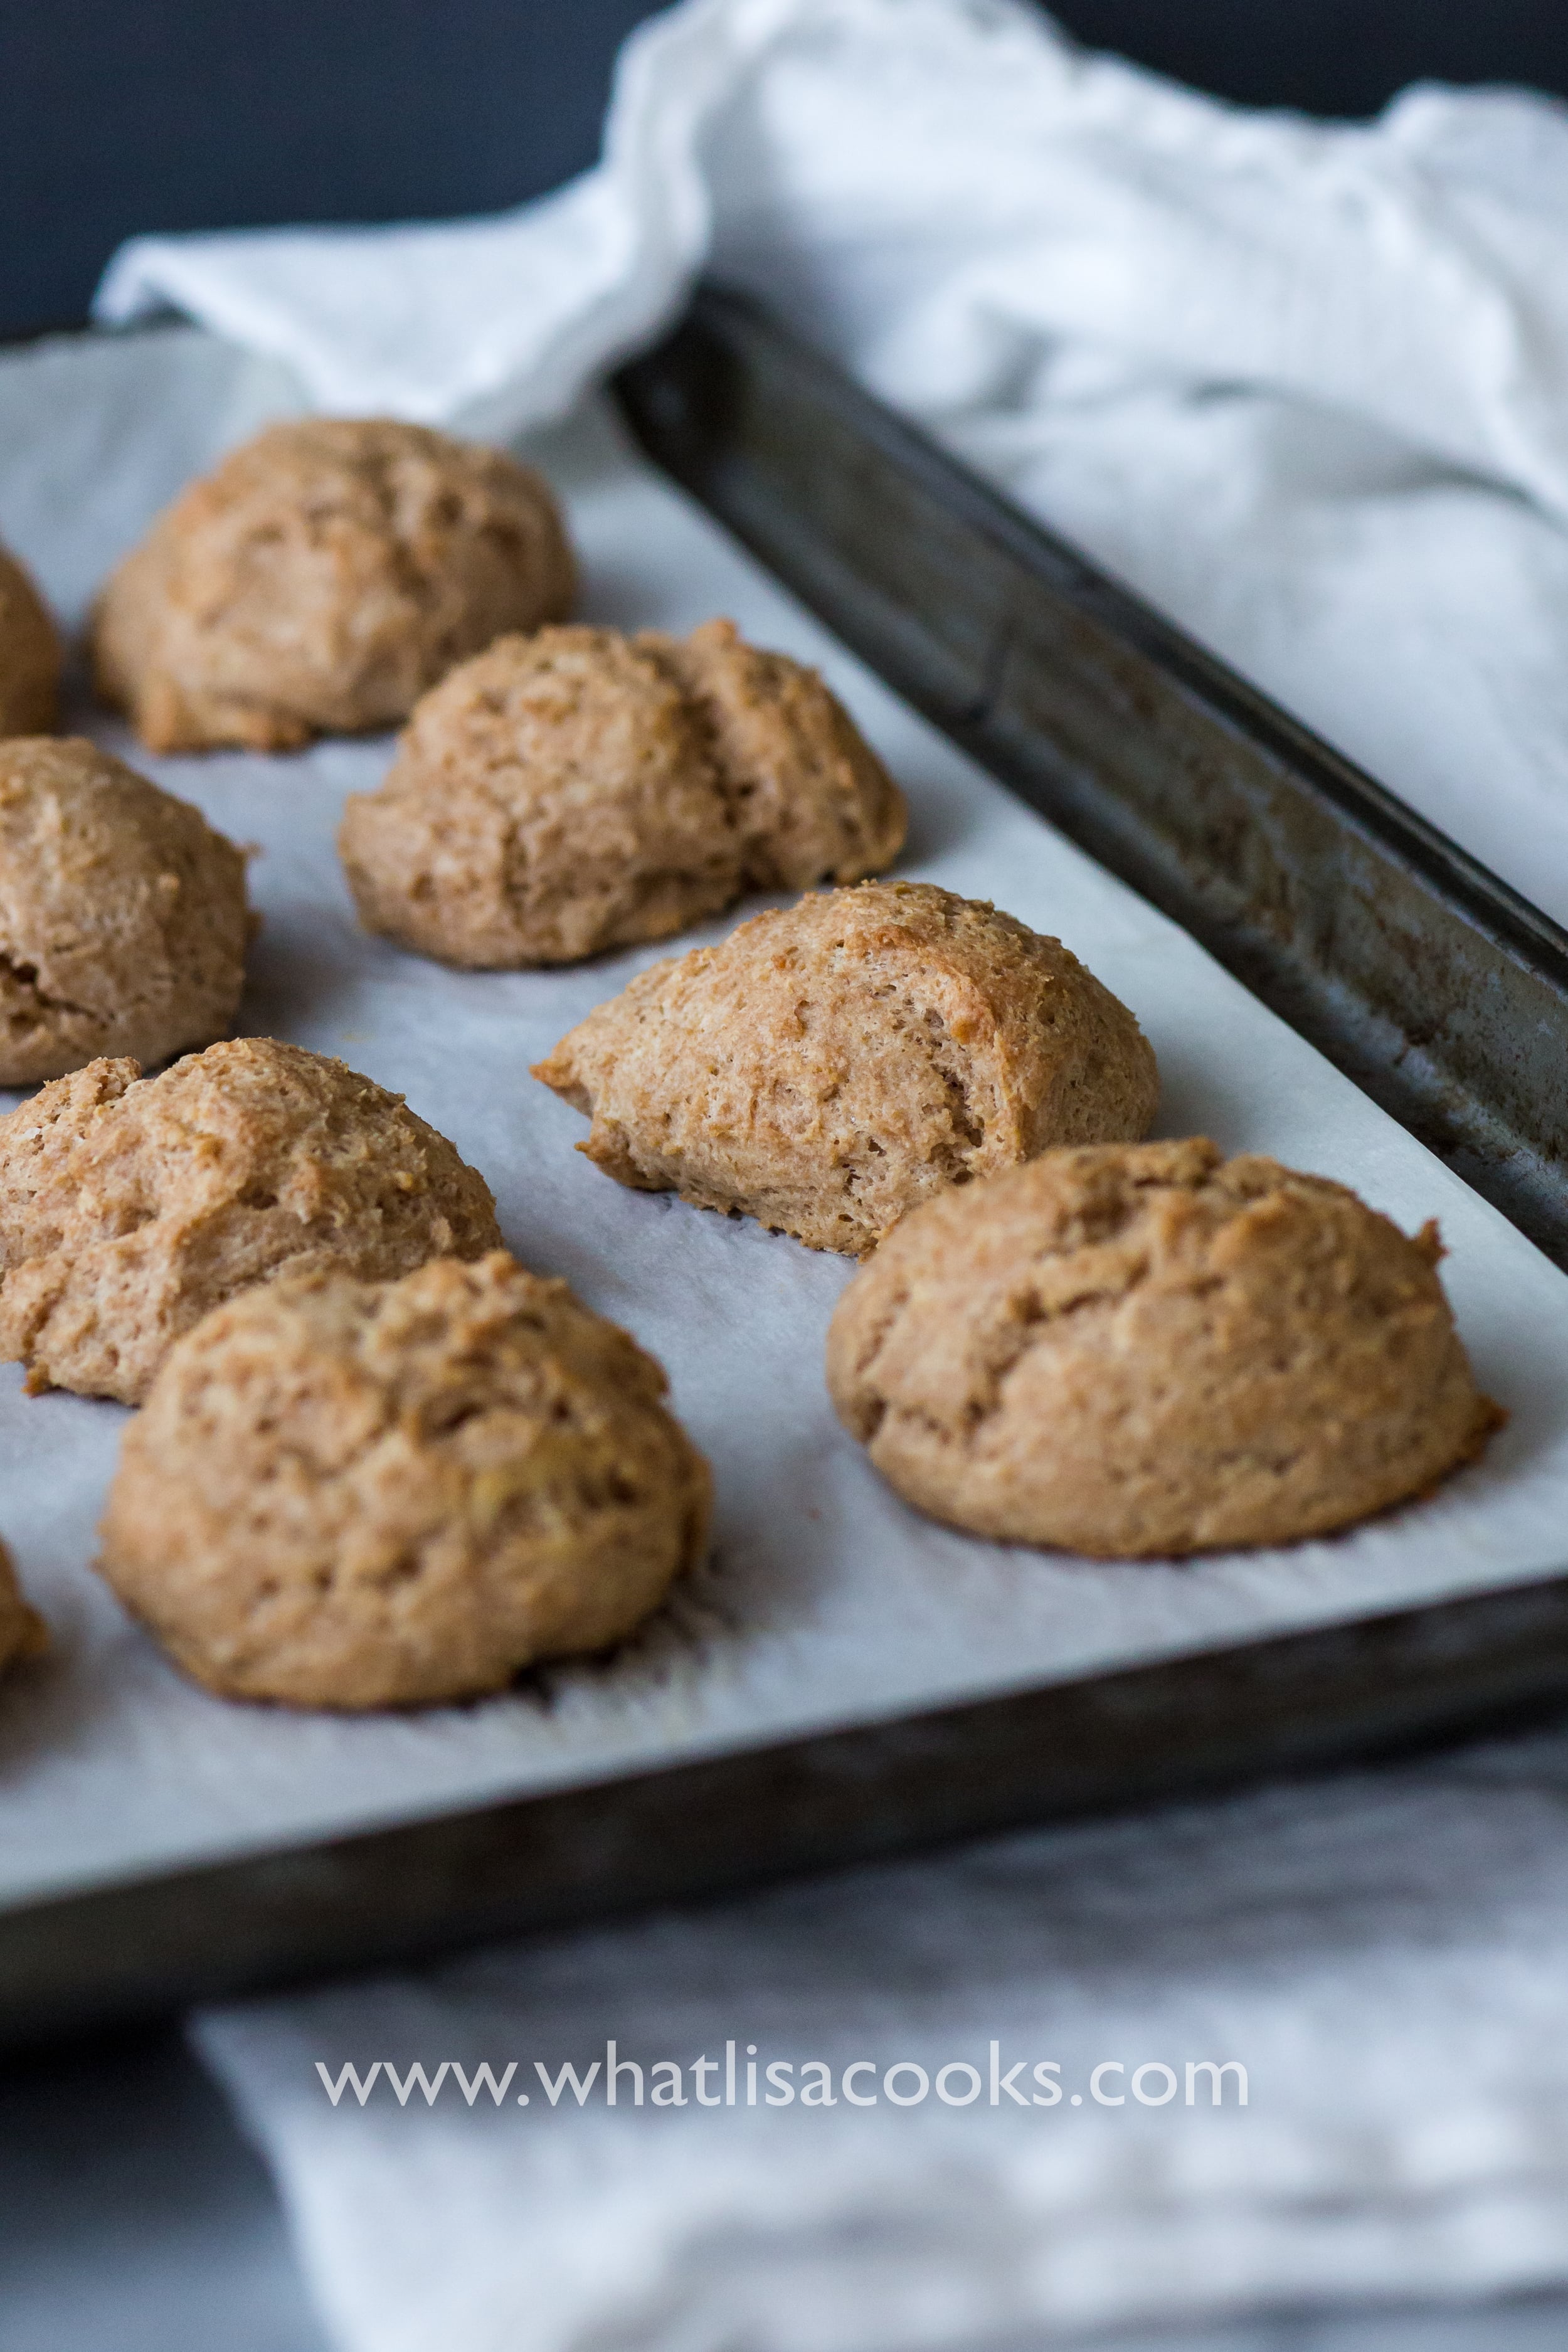
5 minute whole wheat drop biscuits
With simple ingredients and the use of a handy kitchen appliance, you can have fresh biscuits out of your oven in a half hour from start to finish - and in the oven in just 5 minutes from when you start. These are my current go-to when I am making a big pot of soup or stew and we want a little something to go with it. They are absolutely perfect for soaking up gravy and broth, and they are amazing just piping hot with a little butter. They are also perfect for my couple of picky kids, because even if they don't eat the soup or stew that I'm serving for dinner, they are at least getting something made with whole grain and the protein of yogurt, milk, and egg.

With simple ingredients and the use of a handy kitchen appliance, you can have fresh biscuits out of your oven in a half hour from start to finish - and in the oven in just 5 minutes from when you start. These are my current go-to when I am making a big pot of soup or stew and we want a little something to go with it. They are absolutely perfect for soaking up gravy and broth, and they are amazing just piping hot with a little butter. They are also perfect for my couple of picky kids, because even if they don't eat the soup or stew that I'm serving for dinner, they are at least getting something made with whole grain and the protein of yogurt, milk, and egg.
Ingredients:
2 Cups of whole wheat flour
1 cup whole milk plain yogurt
1/2 cup whole milk
1/2 cup (1 stick) cold butter, cut into cubes
1 1/2 teaspoons baking powder
1 teaspoon salt
1 egg
Directions:
Food Processor: Put everything except the flour the food processor bowl and process until blended, then add the flour and turn on again just until the flour is combined.
High Powered Blender: Put everything except the flour in the blender and blend until mixed. Measure flour into a separate bowl, pour the liquid mixture in, and stir/fold until just combined.
The key with either method is to not over process the flour, that will make them tough. The secret to light biscuits, even with whole wheat flour, is mix just enough to get all the flour combined, and no more. It's even ok if you have a few little spots of dry flour, because it will get absorbed as they bake. You can see in my picture below, these weren't perfectly mixed, there are spots of flour and spots of yogurt that aren't mixed in. But they came out perfect.
Once combined, use a medium sized cookie scoop to drop balls onto a parchment lined baking sheet. You can also do this with a spoon, but the cookie scoop is much faster. Bake at 350 for 20-25 minutes, until puffed and golden brown.

Notes:
You could do this with half whole wheat and half AP flour
I have made these with cottage cheese instead of yogurt and they are equally amazing. The cheese gets blended in, so the chunks are not an issue.
You could also use buttermilk instead of the combination of yogurt + milk. Just do 1 1/4 cup buttermilk.
I've used plain kefir instead of the milk also.
I pretty much always cook with salted butter.
Try adding a handful of grated cheese and/or some herbs to your finished dough!
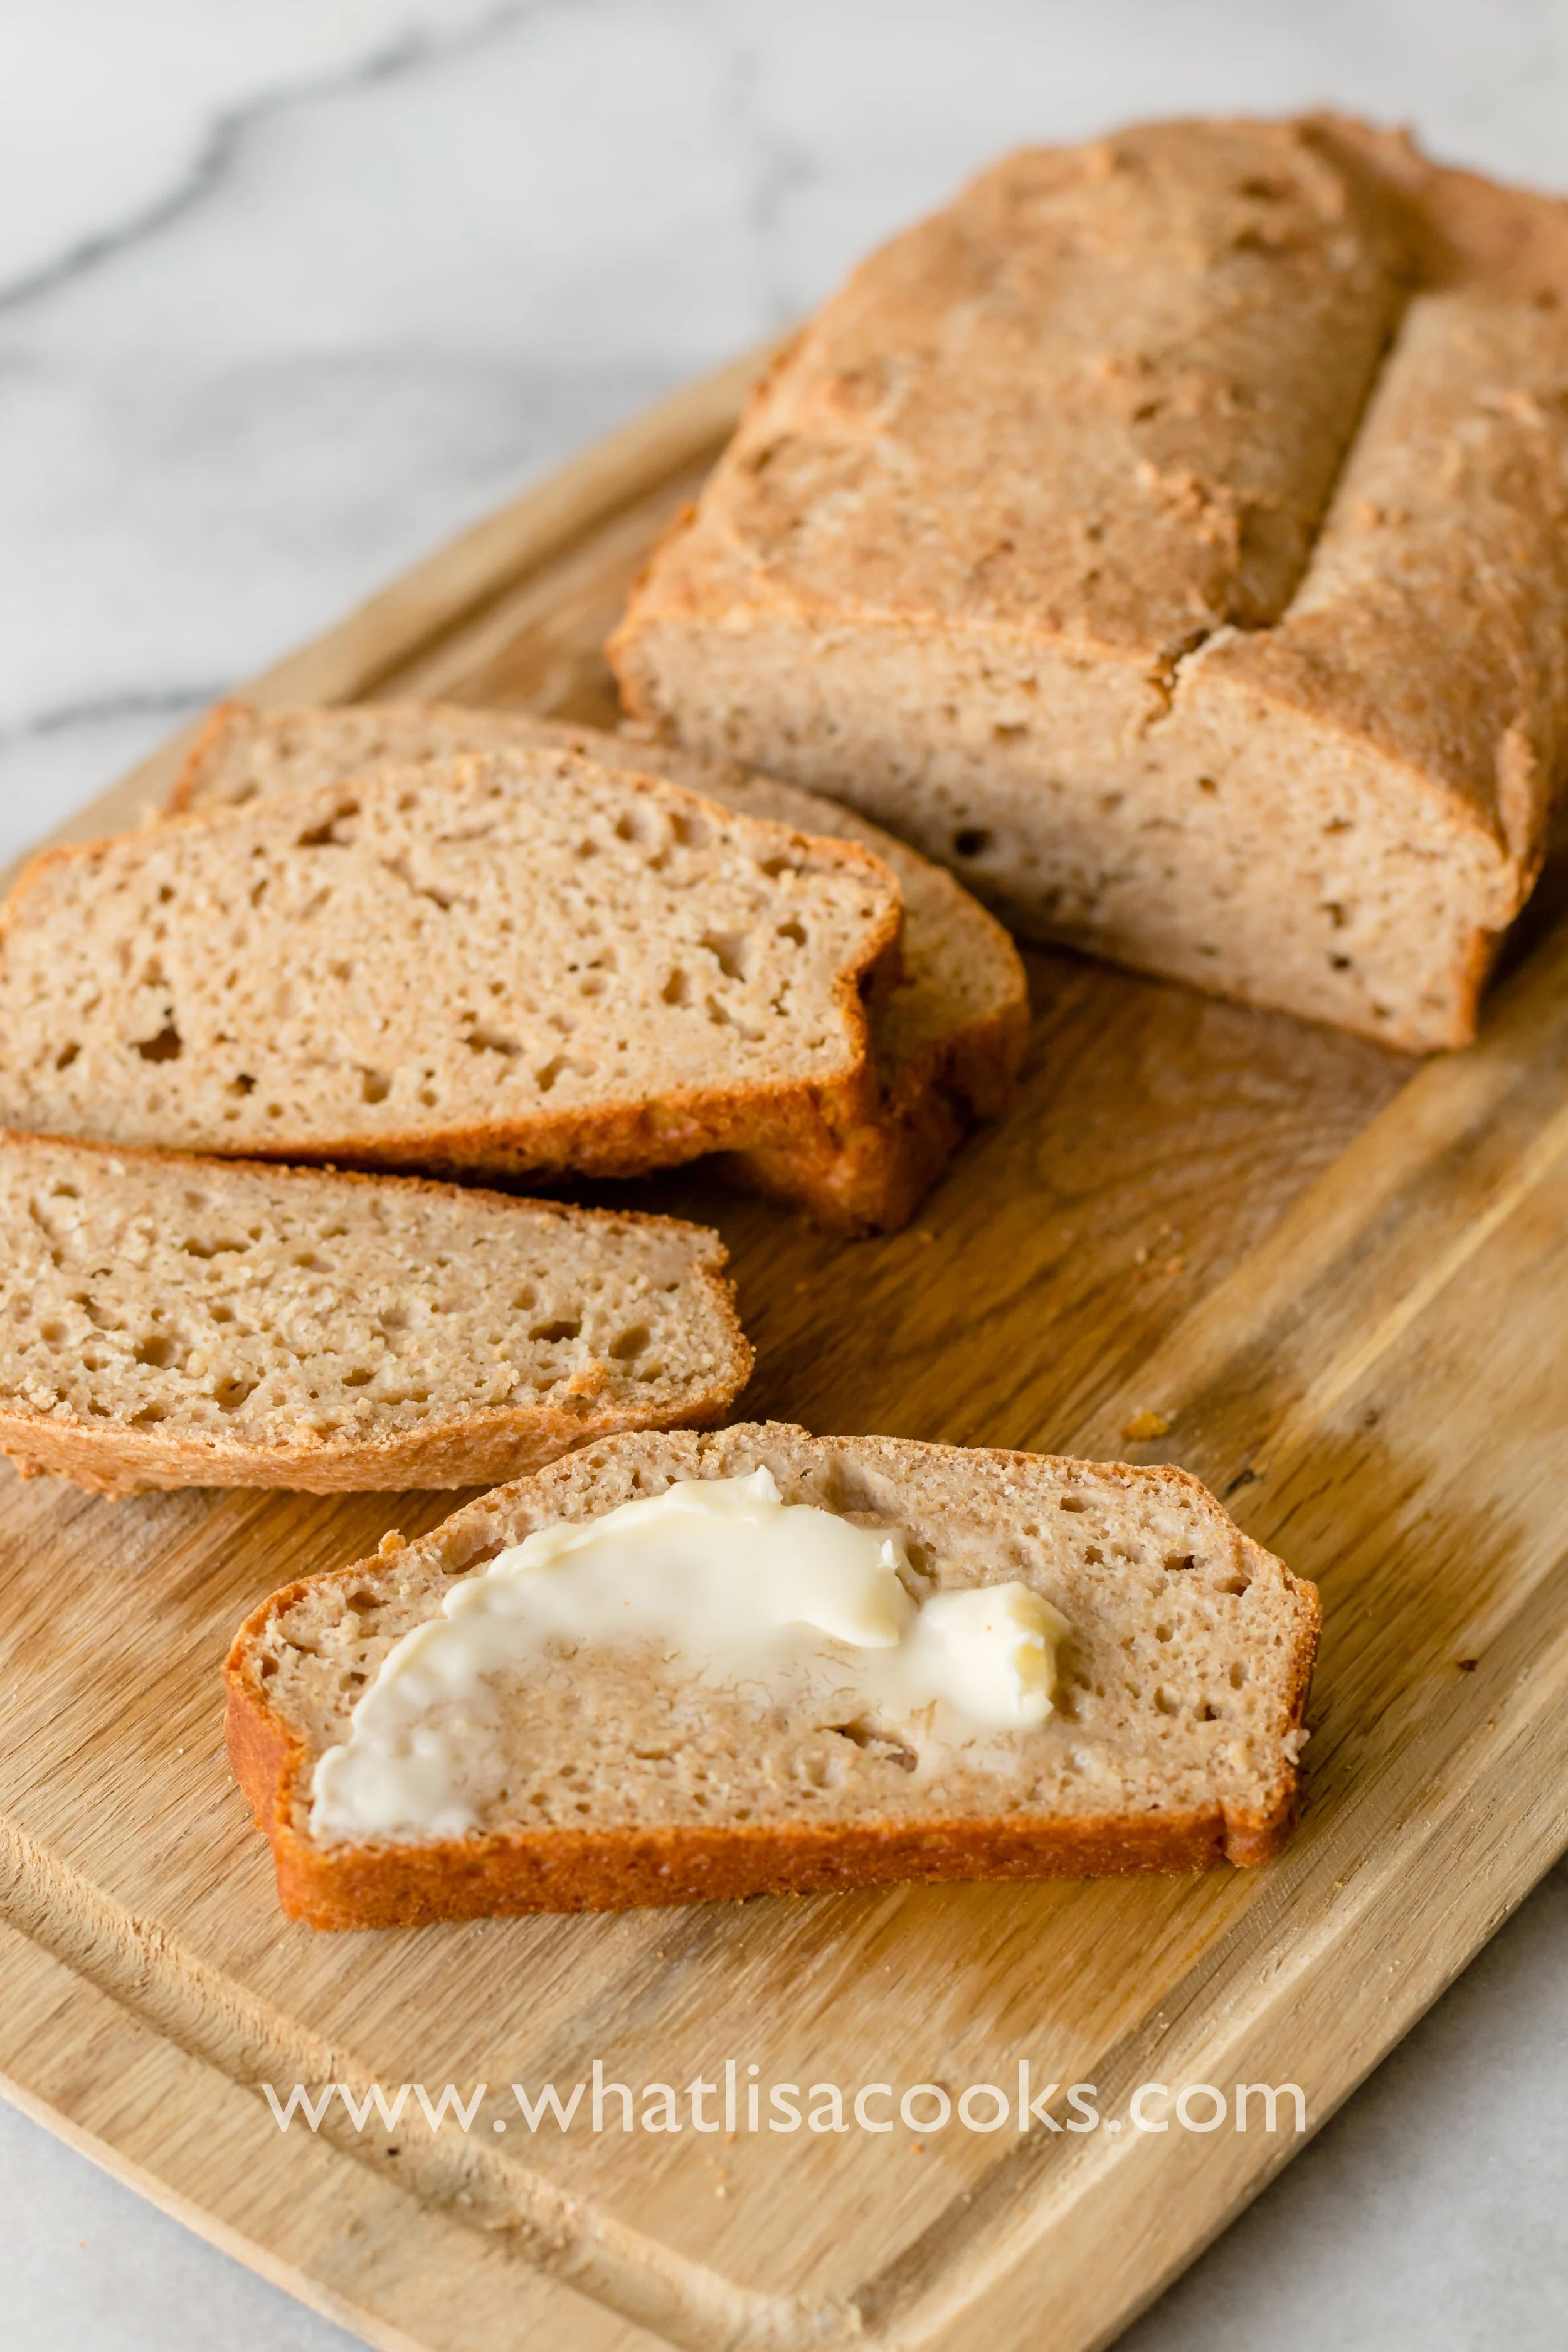
I have also made this recipe as a loaf, and it's equally awesome and even faster. Just dump the whole batch of batter in a buttered loaf pan, and bake for about an hour. It's great as a side with a soupy dinner, and also great toasted - a perfect solution if you need a quick loaf. It's basically like a savory quick bread.

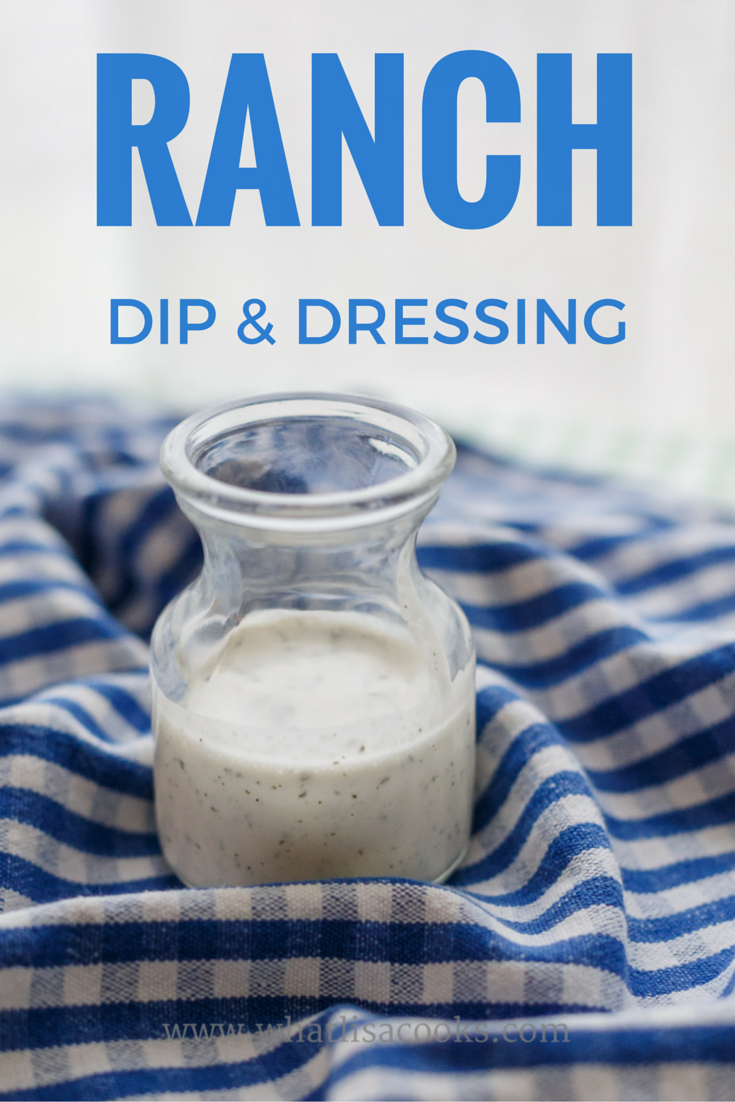
Homemade Ranch Dip & Dressing
Ranch dip and ranch dressing have become classic flavors that a lot of us could not picture life without But do you really need to buy it in a bottle? I don't think so. It's so easy to make from just ingredients that you probably already have in your pantry & fridge, there's really no need to ever buy it again!
This is a light and tangy sour cream & yogurt based Ranch Dressing recipe. A lot of ranch recipes call for mayonnaise. Now don't get me wrong - I LOVE mayo. But not in ranch. I want my ranch dip to be light and tangy. And by light I don't mean low fat - you'll notice that I'm using full fat sour cream, yogurt, and milk - but I mean not oily, not heavy, not that richer flavor that comes with mayo. I just prefer it this way. But honestly you could take this basic blend of seasonings and add it to whatever combination of cream/yogurt/mayo/milk/etc. that you like. It will taste great.
I don't think you can have a summer spread without crisp veggies and a homemade ranch to dip them in! Ranch is also basically my favorite summer salad dressing - I just find it so cool and refreshing.

Ranch dip and ranch dressing have become classic flavors that a lot of us could not picture life without But do you really need to buy it in a bottle? I don't think so. It's so easy to make from just ingredients that you probably already have in your pantry & fridge, there's really no need to ever buy it again!
This is a light and tangy sour cream & yogurt based Ranch Dressing recipe. A lot of ranch recipes call for mayonnaise. Now don't get me wrong - I LOVE mayo. But not in ranch. I want my ranch dip to be light and tangy. And by light I don't mean low fat - you'll notice that I'm using full fat sour cream, yogurt, and milk - but I mean not oily, not heavy, not that richer flavor that comes with mayo. I just prefer it this way. But honestly you could take this basic blend of seasonings and add it to whatever combination of cream/yogurt/mayo/milk/etc. that you like. It will taste great.
Ingredients:

1 cup sour cream (get some real sour cream, not one with a bunch of thickeners and extra stuff)
½ cup plain whole milk greek yogurt
Up to 1 cup whole milk, depending on whether you want this more for dipping or pouring
2 tablespoons freshly squeezed lemon juice
2 tablespoons dried parsley
1 tablespoon dried chives
1 1/2 teaspoon kosher salt
1 1/2 teaspoon onion powder
1 ½ teaspoon garlic powder
1 teaspoon freshly ground black pepper
1/2 teaspoon dried dill
I wanted this to be a recipe that I could make with things I always have in the house. A lot of recipes call for buttermilk, but I don’t usually have buttermilk just hanging out in my fridge. You could certainly swap out the milk + lemon juice for buttermilk if you have it or prefer it, but I like flavor of the lemon juice anyway. You don’t have to include the yogurt, you could just use all sour cream, but I like the tanginess that the yogurt adds. The quantities of seasonings are definitely all about personal taste. Sometimes if I’m looking for more zing I’ll add a lot more of some or all of the seasonings.
So, in keeping with my usual style, this "recipe" is more of a guideline to get you started.
Directions for Dressing: throw all the ingredients together and mix well. I like to make mine in a Blender Bottle, it’s easy to mix and easy to pour out of. But you can just as easily mix in a bowl with a whisk, and then pour in a jar.
Directions for Dip: mix together everything except the milk. Then add milk a little at a time until it's the thickness that you want for dipping.
The milk is where you can control the thickness – if you want a thick dip, don’t add the milk at all (and I would cut back on the lemon juice a little). If you want a nice, pour-able dressing, add up to a cup of milk. If you’re going to leave out the milk altogether (and most of the lemon juice), then the blender bottle probably won’t work as it will be too thick, I would just put it all in a bowl and stir until well mixed.
You can totally make this right before serving, just try to let it sit for at least 10 minutes or so. But it’s really better if you can make it ahead. This is a big recipe – double the size of some of the original ones I looked at for ideas. If you're making dressing it will give you enough for several salads, or it will be a good size bowl of dip for a party. If I’m going to make something I always like to have extra. Making something from scratch does take a little more time than just opening a bottle, but if you've made extra then the next time you want it you do get to just go to the fridge and open a bottle.
If you want to make this even faster the next time - just go ahead and double, triple, quadruple the dry ingredients and store them in a jar. Then all you have to do is mix it in with the wet stuff.
Enjoy!

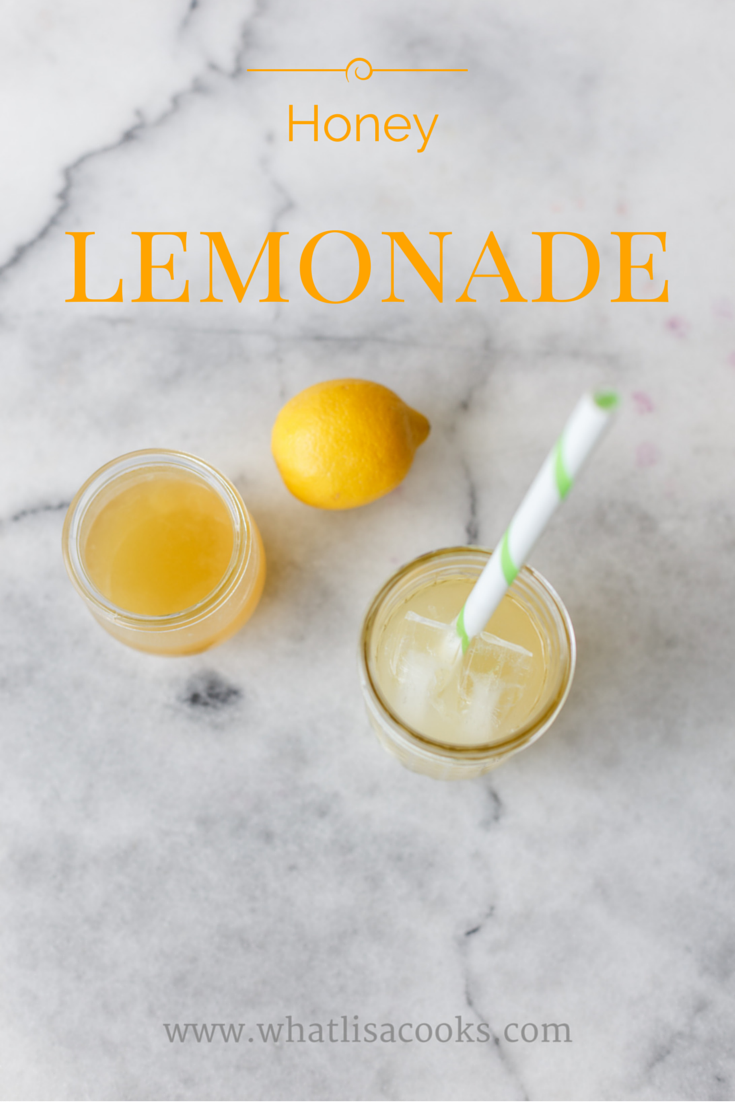
Homemade Honey Lemonade Recipe. And a Cocktail - Because You Earned It.
Easy recipe for homemade lemonade - fresh squeezed and sweetened with sugar. Plus a bonus recipe for an adult lemonade cocktail.
Summer is not the same without lemonade. Squeezing dozens of lemons isn't something I'm going to do every day - but every now and then, it's so worth it. This is the best homemade lemonade, and the basis for one of my favorite simple summer cocktails.

It's not quite summer yet, but we sure have had some lovely spring weather around here. The kind of weather that makes you think of cold, refreshing lemonade!

One of my kids has recently decided that she doesn't want to drink much. It's a whole long story about night wetting, and really trying to stay dry, and her making the connection about drinking = wetting, and so refusing to drink. But refusing to drink much also leads to some other problematic stopped up type bathroom issues which aren't too fun for a little kid (which actually contribute to wetting), which I don't need to go into any more than that (because bathroom stuff = TMI on a food page!).
So anyway, long story made even longer... I have been trying to get creative about coming up with things that she really wants to drink. And she LOVES lemonade. But store bought lemonade has so much sugar! Even the good brands, and the organic brands, it's just so much processed sugar. And it gets expensive after a while. And most recipes you read call for cups and cups of white sugar too.
I wanted to come up with my own that didn't have as much highly processed white sugar in it - so I created this recipe that is sweetened mostly with honey. Of course it's still sugar in some form, but at least it's not so much of the white stuff. I did try this with all honey, but in order to get the right balance of sweetness with the lemons I personally thought it ended up with too strong of a honey flavor for a child's palette. So I balanced it out with a little organic sugar.
Ingredients:

5-6 cups of water (or more)
1 1/2 cups freshly squeezed lemon juice (about 2 pounds of medium lemons)
1 cup of honey
1/2 cup raw or organic sugar
1/4 teaspoon salt
Directions:
In a small saucepan, combine honey, sugar, salt, and 1 cup of water.
Don't let the salt worry you - it does not taste salty. Just a little salt brings out the flavor in everything -it's the secret ingredient in a lot of sweet treats.
Let this simmer until all the sugar and honey are dissolved and well combined. You're basically making a honey simple syrup here.
Once you get that going, squeeze your lemons.
After you've got a few lemons squeezed, put a few of the squeezed out halves in your pot of simmering syrup. This will give your syrup an extra little kick of lemon flavor.
Watch that pot carefully, honey can boil over really quickly! Just keep it on very low so the heat can help extract that lemon flavor, while you work on squeezing the rest of your lemons.
Take the syrup off the stove, strain out the lemons, and add 1 1/2 cups of fresh squeezed lemon juice.
Now - STOP!

What you have is an amazing and wonderful lemon honey syrup mixture.
This right here is the basis for a fabulous cocktail! So set aside a quarter cup or so of this mixture and save it for later. Mix a tablespoon of this with an ounce of your favorite bourbon or other liquor, shake with ice, pour into a glass and top with a splash of soda (We make ours in a SodaStream, and we love it!). It's a fabulous cocktail and you surely earned it after squeezing all those lemons!
Cheers!
Or for something a little different - you can use that lemon syrup mixture to make an awesome lemon soda! Just mix to your liking with sparkling water for a super refreshing and slightly more sophisticated thirst quencher, without alcohol.
OK. Back to the lemonade...

After you've set aside a bit for yourself, you should have about 3 cups or so of the lemon honey syrup mixture. You'll notice that this is not a pure yellow color like most lemonade, because the combination of the honey and the organic sugar are going to give it a more golden color. I personally think that looks really pretty!
Pour this in a big pitcher or jar and add 4 or more cups of cold water - this is the part that is really up to your personal taste. If you want a very strong and sweet lemonade, add less water. If you want it more diluted then add more water.
For my kids I serve it pretty diluted and they still love it - it helps get them hydrated and actually isn't all that much sugar when you do the math (a cup and a half of honey + sugar, diluted across 6-8 cups of water).
It's so refreshing over ice! Enjoy!


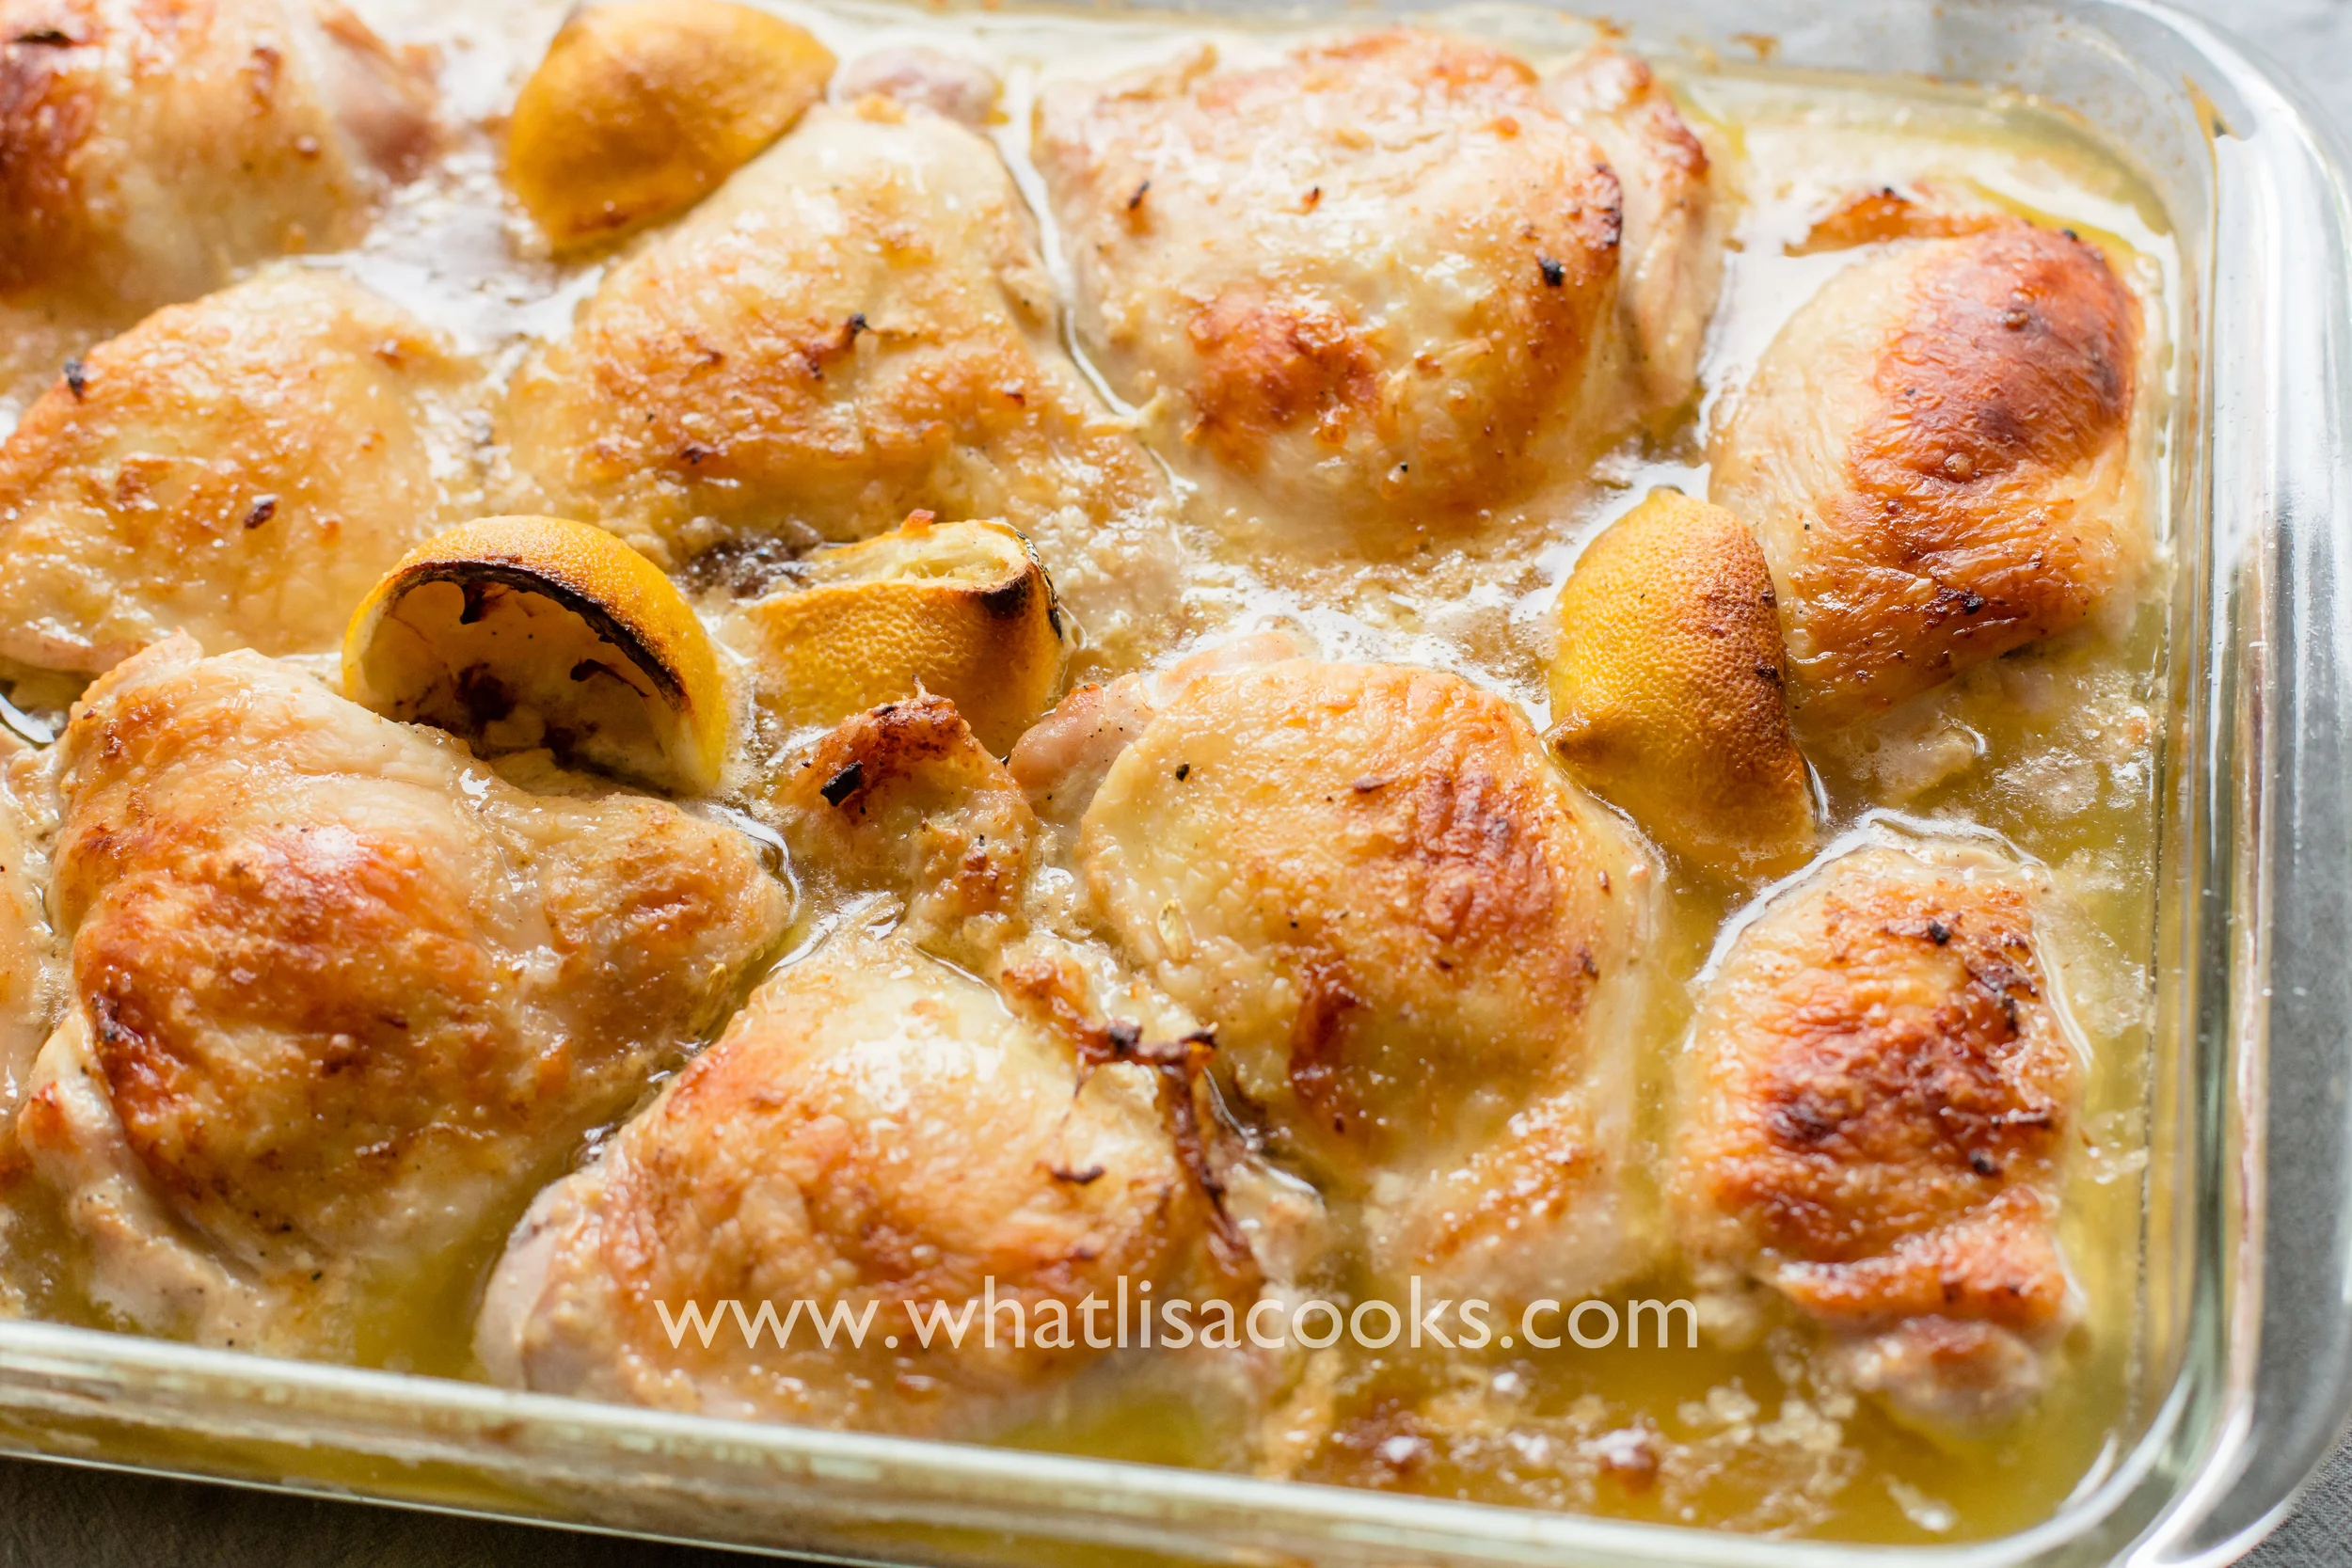
Weeknight Lemon Dijon Chicken Thighs
This is my favorite weeknight chicken recipe. I've made this for years without a recipe, but the last time I made it I finally took the time to scribble down what I put in it, and take a few pictures for you. It's so easy, once you've made it you don't really need a recipe.
Hands down my favorite way to cook chicken. It's so easy. This recipe has instructions for the oven below, but you can also let this marinade and then throw them on the grill for a summer dinner. I do them for about 7 minutes each side over medium heat. Use the leftover marinade to baste them a couple times on each side.

This is my favorite weeknight chicken recipe. I've made this for years without a recipe, but the last time I made it I finally took the time to scribble down what I put in it, and take a few pictures for you. It's so easy, once you've made it you don't really need a recipe.

The quantities are just a guideline - it really doesn't matter how much of each thing you add. It's all good.
Ingredients:
3-4 pounds chicken thighs (you can use other pieces as well, but thighs are my favorite)
1/2 cup white wine (and a little extra for the cook)
1/2 cup fresh lemon juice (and the squeezed lemon halves)
1 teaspoon salt, and a little more to sprinkle on top
a heaping tablespoon dijon mustard
1 teaspoon (or more) crushed or chopped garlic
fresh round pepper, to taste
Directions:
Preheat oven to 400.
Put chicken pieces in zip top plastic bag. Add all the rest of the ingredients. Don't for get to add the pieces of lemon that you squeezed, they add great flavor. Close the bag securely and just massage it all around so it's well mixed and the chicken is well coated. If you have time, let this sit for an hour or more. If not, that's fine too. When you are ready to cook, just dump it all in a casserole dish or other oven safe pan. I like to sprinkle a little more salt on top, because I love that salty, crispy skin.
Cook for 35-45 minutes - depending on how hot your oven is (mine runs a little cold) - until all the juice looks clear and cooked (no red or pink juices from the chicken), and the skin is nicely browned. The nice thing about thighs is that it's harder to overcook them, you have to really overcook them in order for them to not be good. Also cooking with all this marinade helps too, it really keeps them juicy. If you decide to do this with white meat you will need to watch it more closely.
I like to serve this with some white rice or plain pasta on the side. The juices from the chicken, combined with the lemon juice, wine, and mustard, make the most amazing and delicious sauce, so you really don't need to do anything else. Steam a veggie or make a quick salad, and you have a super easy weeknight dinner.
After you're done - don't throw out those bones! Take the meat off the bones and save, and dump everything else that's left into a pot, cover with water, and simmer for a couple hours until you have broth. It's the most amazing lemony flavored broth and it is perfect for making soup.

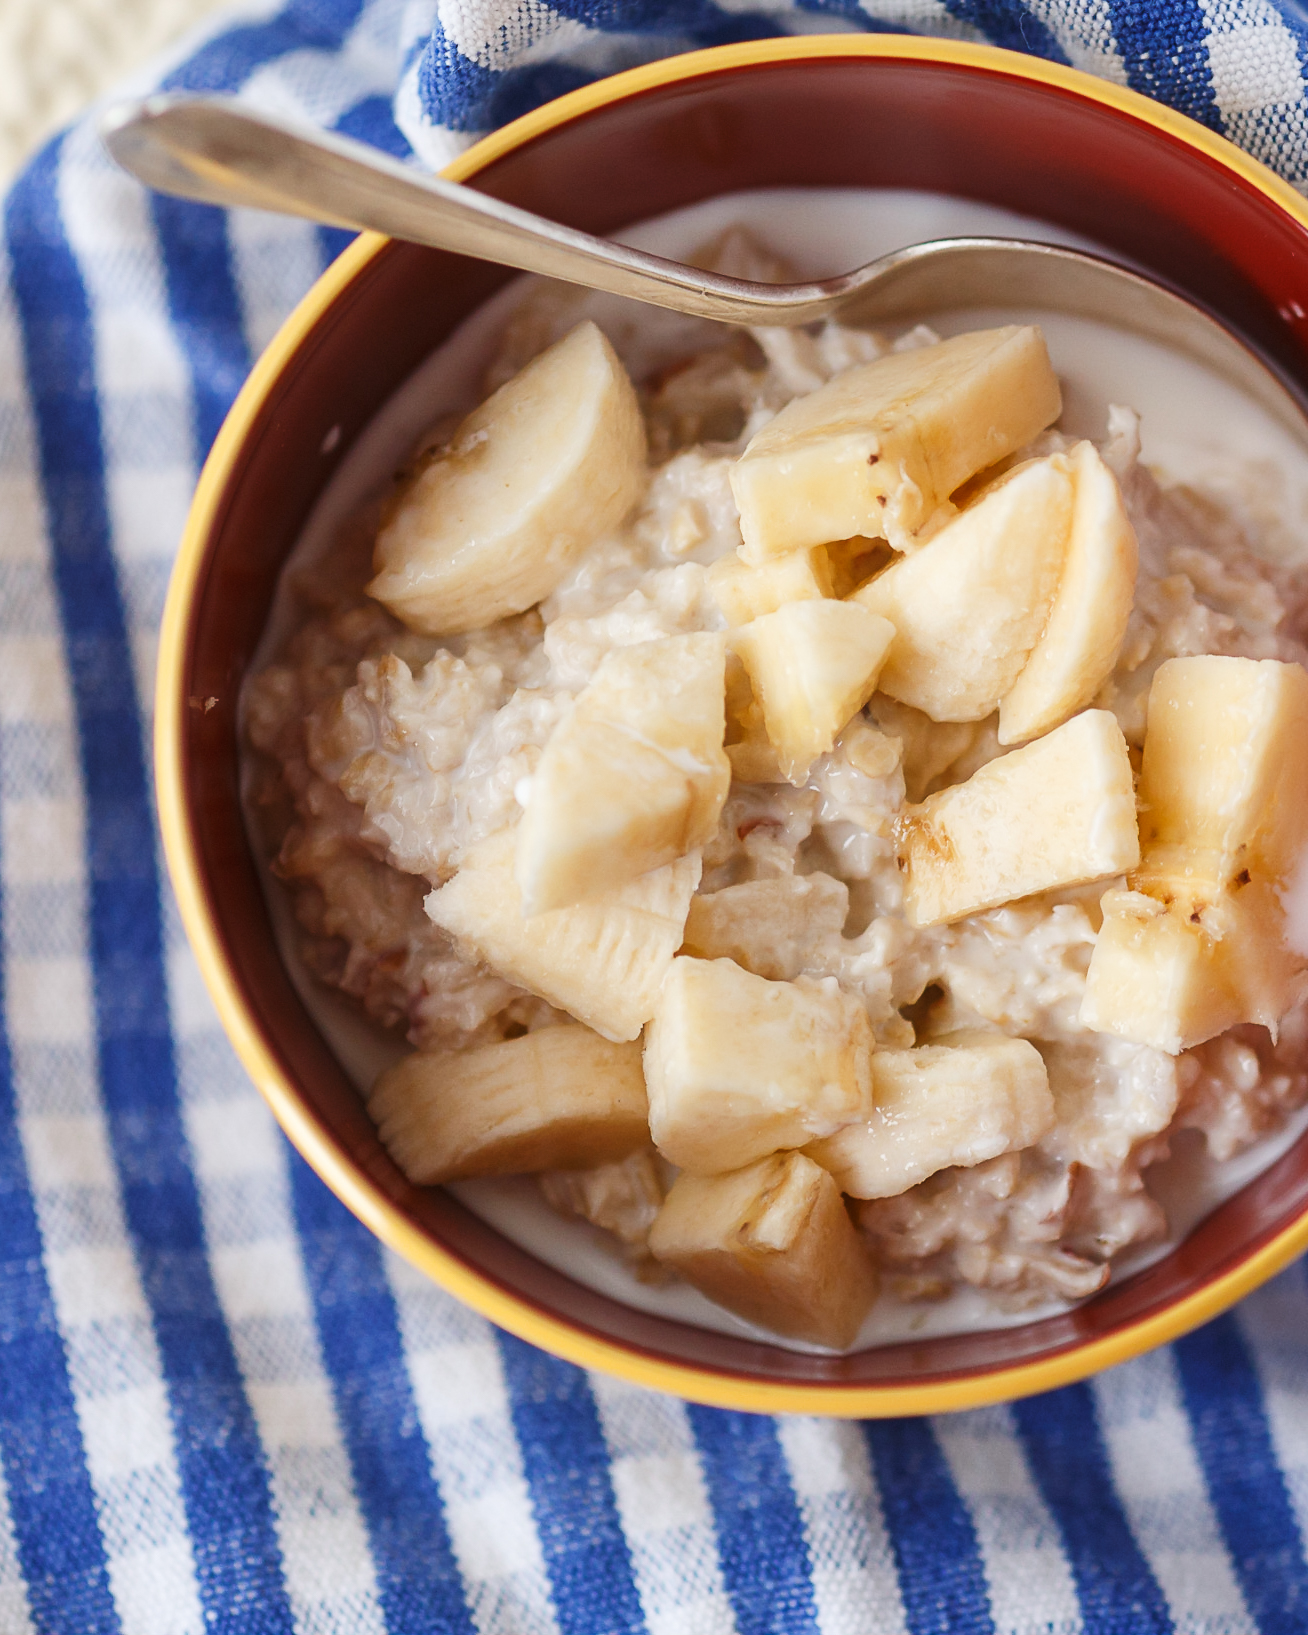
Swiss Muesli: an easy overnight oats recipe that the whole family will love
Do you want a breakfast that's easy, hearty, and healthy, and the whole family will love? Well this might just be it.
Have you seen all the buzz lately about these overnight refrigerator oats recipes? Seems like some new way to make oats? Nope, not new. The Swiss have been doing it this way for over 100 years. They call it Muesli, or Swiss Muesli, or Bircher Muesli (named from the doctor that created the recipe for the health benefits of his patients). This is not the "muesli" that you've seen in a cereal box. That is a granola like cereal that has some oats and dried fruit and somebody decided to give it the name because some of the ingredients are similar. No, this is a totally different thing - it's a way of preparing oats that's like nothing you've probably ever tasted. I love it, it's one of my favorite breakfasts. I first learned about Swiss Muesli almost 30 years ago, when my older sister came home from being an exchange student in Switzerland. She introduced us to the way the Swiss do oats, and I've loved it ever since. In the summer I like to make up a huge bowl and eat it for breakfast all week long. It's cool and refreshing, but hearty and filling. And you can dress it up however you like.
Swiss Muesli: The original easy overnight oats recipe
Muesli is one of my favorite summer breakfasts.
It's cool and refreshing when it's hot out, and it's made ahead, so you don't have to spend time in the kitchen on a beautiful summer morning. Everybody who has tried my version of this recipe loves it!

Do you want a breakfast that's easy, and hearty, and healthy, and the whole family will love?
Well this might just be it.
Swiss Meusli is the original easy overnight oats recipe.
Have you seen all the buzz lately about these overnight refrigerator oats recipes?
Seems like some new way to make oats? Nope, not new. The Swiss have been doing it this way for over 100 years. They call it Muesli, or Swiss Muesli, or Bircher Muesli (named from the doctor that created the recipe for the health benefits of his patients).
This is not the "muesli" that you've seen in a cereal box. That is a granola like cereal that has some oats and dried fruit and somebody decided to give it the name because some of the ingredients are similar.
No, this is a totally different thing - it's a way of preparing oats that's like nothing you've probably ever tasted. I love it, it's one of my favorite breakfasts. I first learned about Swiss Muesli almost 30 years ago, when my older sister came home from being an exchange student in Switzerland.
She introduced us to the way the Swiss do oats, and I've loved it ever since. In the summer I like to make up a huge bowl and eat it for breakfast all week long. It's cool and refreshing, but hearty and filling. And you can dress it up however you like.
There are so many ways to make muesli, with various combinations of milk, yogurt, juice - but the basic idea is combining oats with some combination of those, plus apples, and soaking overnight.
The apple appears to be required, in order for it to be the original Bircher Muesli. I think it's part of what makes it so unique, although you could leave it out if you prefer.
What you get in the morning is so great - the oats have soaked up the liquid and have softened, but not turned to mush. They still have some texture, just enough, and they have flavor.
The bits of grated apple are still a little crisp. There's just enough sweetness from the honey. The milk and yogurt are creamy. It's just so good.
If you look around you'll find that no two recipes are exactly alike. The original Bircher Muesli is still around, but now it has evolved and everyone makes it just a little different. My personal preference is what I think is a pretty simple version.

Here's how I make Swiss Muesli.
Ingredients:
2 cups old fashioned rolled oats (not quick oats!)
1 cup of milk (whatever kind you like)
1 cup of plain yogurt
1/4 cup (or less if you like less sweet) of honey
Juice from 1 medium size lemon
1 large apple, grated.
Optional toppings:
milk, cream or half & half
diced fresh fruit
dried fruits
chopped nuts
seeds
dried coconut
anything else that sounds good!
Preparation:
Mix together all of the ingredients (not the toppings), cover, and refrigerate overnight. If it's your first time making it, you might want to hold back on some of the honey, mix everything else, and taste. See if it's sweet enough before you add all the honey. It might vary depending on how big or sweet your apple is. Also if you've used almond milk or some other kind of non-dairy milk that's sweetened, I would leave out the honey altogether until you've tasted it.
In the morning, scoop out a serving, and top it however you like. I like mine with just a little bit of extra half & half and some diced bananas or some blueberries. Simple, creamy, just a little tart from the lemon and apple, just sweet enough from the honey and banana. Breakfast perfection.
You can go as crazy as you want though - nuts, all different kinds of dried and fresh fruit, sunflower seeds or chia seeds, or ground flax seeds, nut butter - whatever sounds good. If you want, you can really load it up with all kinds of yummy and nutritious stuff. This is way more than just overnight oatmeal!
Give it a try, and let me know what you think.
Enjoy!
~ Lisa

Easy Quick Bread and Muffin Recipe
A master recipe for making all kids of quick and easy muffins or breads! This recipe is made with whole wheat flour, whole fruits and veggies, and no refined sugar (or very little, if you decide to add some). It is sweetened with just a little honey and the natural flavors of fruit. Best of all - it's made all in the blender, and takes less than 5 minutes from start until it's in the oven. It is so fast and easy, you are just not even going to believe it. This is not your grandma's banana bread - there is no need to let your butter or eggs come to room temperature, there is no creaming of butter and sugar. You aren't washing multiple bowls.
An easy recipe for quick bread and muffins that comes together super fast in the blender.
My kids love it when I make homemade breads and muffins - the climb all over each other to be the first one to get to the banana bread or carrot bread or pumpkin muffins. They get so excited when they see me mixing, or smell it baking, or see it come out of the oven. I can hardly make them wait until it's cool enough to eat. But I haven't been making it all that often, because it just seems like too much work and advance planning. I am no good at setting butter or eggs in advance out to get to room temp, and the creaming of butter and sugar seems like a lot of effort, and I can't stand the mess of all the bowls I need to wash. Sometimes it just seems like more trouble than it's worth. I've got a lot going on.
But I couldn't help but think that there had to be an easier way. There had to be a way to shortcut some of those steps. So I set out to figure it out.

Banana chocolate chip mini muffins.
My goals: it had to be easy, it had to be fast, but it still had to be relatively healthy. I wasn't going to trade off making it easier by using processed junk. So many quick bread recipes you see call for so much sugar, it's crazy. We need to just be honest with ourselves and call those things for what they are: they are cake. If a recipe has a couple of cups of sugar in it, it's not bread. It's cake. And don't get me wrong, I love cake. But not for an everyday staple, for a school day breakfast or an after school snack. So I had to come up with a recipe that was going to taste great but not be loaded with sugar. And I think I've done it!
This is it folks, the last quick bread recipe you will ever need.
This recipe is made with whole wheat flour, whole fruits and veggies, and no refined sugar (or very little, if you decide to add some). It is sweetened with just a little honey and the natural flavors of fruit. Best of all - it's made all in the blender, and takes less than 5 minutes from start until it's in the oven. It is so fast and easy, you are just not even going to believe it. This is not your grandma's banana bread - there is no need to let your butter or eggs come to room temperature, there is no creaming of butter and sugar. You aren't washing multiple bowls.

Carrot Apple Bread and Pumpkin Muffins
This. Is. Easy.
It's the perfect balance of hearty and sweet, with a little tang from plain yogurt. It's moist in the middle, just a little chewy and just a little crumbly, with a nice crunch of crust on the top. Spread a hot slice with some butter, or a little cream cheese, and I think you've got breakfast or snack time perfection.
What I have for you is a basic master recipe that can be used to make any number of flavors of quick bread. You can turn this into a super quick zucchini bread, banana bread, pumpkin bread, apple bread, carrot bread, or whatever else you like. I've tried it with all of those, and a number of combinations. I LOVE the combinations. I've made apple + carrot, carrot + pear, zucchini + banana, apple + carrot + chocolate chip. The combination of a little fruit and a little veggie gives a great flavor and just the right amount of sweetness. See the variations below for some suggestions of flavor combinations.
This is not a super sweet loaf, because that's how I like it. If you like your breads to be more sweet, then you'll want to increase the honey or add a little sugar (I included a bit of brown sugar in the ingredients as optional - read my note about it).
I recommend you read all the way through before starting. This is very easy, but the technique is a little different than what you are used to, so you want to read the directions before you just start tossing stuff in a bowl. This is still a basic "mix your wet, then mix your dry, the combine the two" type of situation, but the way you mix the wet and the way you combine are a little different.
Ingredients: (in the order in which I add them)

Carrots & Pears
1/2 cup honey
1/4 cup plain Greek yogurt (I use whole milk yogurt. Sour cream will work too)
Approximately 1 cup pureed fruit and/or veggies (apple, banana, carrot, zucchini, pumpkin, etc.). Or enough whole fruit & veg, roughly chopped, to make about a cup pureed. (see notes & variations below)
1/2 cup (1 stick) salted butter
1 egg
1 teaspoon vanilla
optional: 1/4 cup brown sugar (see notes)
1-2 teaspoons cinnamon (see notes & variations)
2 cups whole wheat flour
1 1/2 teaspoons baking powder
1 teaspoon salt
Oil spray or butter for the baking pan.
optional: up to a cup of chopped nuts, raisins, chopped fruit, or even chocolate chips!
Recipe makes 1 regular loaf, or 3 mini loaves, or 12 standard size muffins, or about 3 dozen mini muffins. I don't recommend doubling this with the blender method, the blender would be too full and it won't mix properly. But it's so fast and easy to mix up that making several at a time is no problem. I made 3 different batches in less than 15 minutes.
Directions:
Preheat oven to 350, or 300 convection. Grease a loaf pan or a muffin pan. (Rub it with a bit of butter, or if you're in a hurry like me just hit it with a little spray oil. I use a coconut oil spray that I get at Trader Joe's.)
Mix together the "wet" ingredients:
In your blender, put honey, yogurt, and fruit and veggies. Pulse the blender until the fruit and veggies are mostly pureed and well blended. Check your quantity - if you are not at 2 cups, you can add a little more fruit and puree some more.
Add butter, egg, vanilla, cinnamon, and sugar if you are using it. Turn on blender to mix at a medium speed until the butter is blended in. This should only take a few seconds, unless your butter is super hard. Pulse it a few times, check to make sure the butter isn't still in a chunk. If you still have some big chunks of butter, then puree a bit more.
Mix together the "dry" ingredients:
In a separate bowl, combine flour, salt, and baking powder.

Combine wet and dry.
Method 1: all in the blender. You can do this all in the blender if you have a high powered blender. Just dump the flour mixture in, put the lid on tight, and turn it on at a high setting. On a Vitamix - this would be variable 9 or 10 - turn the dial to 9 or 10 and then pulse it on and off (don't start on low and turn it up, just start it on high). That will suck some of the flour down to the bottom. Then get in there with a spatula or spoon and stir a little, pulse again, stir a little. You are just trying to get the dry just mixed with the wet so there are no obvious areas of dry flour left. Don't overmix, you just want the flour moistened.
Method 2: in a bowl. You can also do this step in a bowl - just pour your wet mixture in the bowl with the dry, and gently stir until all the flour is moistened.
It should be a fairly thick batter. Pureed raw fruit will still release more moisture when it bakes, so you want to start out with a fairly thick batter in order to have a finished baked good that's not too moist. But if you think it really is too dry to mix together without having to work it too hard, then add a little more moisture. You can add up to a quarter cup of milk, or applesauce, or yogurt.
If you are adding any chopped nuts or fruit or chocolate chips, you will want to do this last step in a bowl. Pour the wet mixture over the dry, add your nuts or chocolate chips, and fold it all together until combined.
Then dump it in your greased loaf pan, or divide into muffin pans, and bake. I've been using this for mini muffins, and using a small cookie scoop to make it quick and even.
Baking times:
(approximate, will vary depending on your oven):
Full size loaf: 1 hour
Mini loaves: 30 minutes
Full size muffins: 25 minutes
Mini muffins: 15 minutes
Notes:
This is not a very sweet recipe. I put a 1/4 cup of brown sugar in there as optional - if you like your breads on the sweeter side, you'll want to add this. Or if you are starting with just veggies that aren't very sweet (like zucchini, or pumpkin), then you'll probably want it. But if you are using super ripe bananas that are already very sweet, or sweet applesauce, then I don't think you need it. If you are adding chocolate chips, then you probably don't need it.
If you are starting with already pureed fruit, then just measure 1 cup and add it to the rest of the wet ingredients and puree.
If you are starting with whole fruit and veggies, you need to estimate what will be enough to total no more than 2 cups when blended with the yogurt and honey. Start with a little, puree, and read the measurement on the side of the blender, then add more if you need to.
If you're worried about pureeing all your fruit and having no actual texture or chunks of fruit, just dice or grate a little and fold that in at the end, the same time as when you would add any nuts or chocolate chips. Remember it will release moisture though, so cut back on your puree just a tiny bit.
I have made this with all purpose white flour. It works. Personally I think the whole wheat version tastes better, it gives it a heartiness that you don't get from white flour, and I think the texture is nicer. But if you want to do it with white flour, go for it. You might want to decrease your wet ingredients just a bit, because the white flour doesn't seem to absorb as much liquid. I have also done half white and half wheat, and that works well.
I have not yet tried it with a gluten free flour, but I will soon. If you try it, let me know.
You could totally skip the yogurt and add an extra 1/4 cup of fruit puree instead (or an extra banana). I just like the little bit of tang that it gives, I think it rounds out the sweet fruit flavors really nicely. It seems to also somehow help contribute to a little crunch in the crust. You can also replace the yogurt with sour cream.
You can do this with less butter, or skip the butter and add more yogurt or some applesauce.

Top: banana; Middle: zucchini; Bottom: apple + carrot
Variations:
Quantities of fruit and veggies here are approximate and will vary depending on size. You still want to follow the rule of no more than 2 cups total when pureed with the honey and yogurt. I want you to experiment! Tell me what combinations you try!
Banana Bread: 3 very ripe bananas, 1 teaspoon cinnamon.
Pumpkin Bread: 1 1/4 cups organic canned pureed pumpkin, replace the cinnamon with 2 teaspoons pumpkin pie spice, replace the honey with real maple syrup, and add 1/4 cup brown sugar.
Apple Bread: 2 medium tart & juicy apples (I've been using Jonagold), 2 teaspoons cinnamon. I think this one is my favorite. It tastes like pie.
Zucchini Bread: 1 medium zucchini, just 1 teaspoon cinnamon, and add 1/4 cup brown sugar.
Apple + Carrot Bread: 1 medium apple, 2 medium carrots, 2 teaspoons cinnamon.
Carrot + Pear Bread: 1 medium pear, 2 medium carrots, 1 teaspoon cinnamon.
Banana chocolate chip: 3 very ripe bananas, 2/3 cup mini chocolate chips, no cinnamon (I don't like cinnamon and chocolate together in this kind of thing).
The possible combinations are endless! We made one this week with carrot, pear, apple, and chocolate chips.

Pumpkin Muffin with butter.
Carrot + Apple bread, with cream cheese.

Banana Chocolate Chip Blender Muffins
I think I need to just bow out while I'm ahead with this one - I will never try another muffin recipe again. My children have declared these to be the best muffins they've ever had. And if you knew my kids, you'd know that they are pretty tough little food critics (my fault, I'm sure).
I've made a couple batches of these over the last week, and they are inhaling them as fast as I can bake them. But it's totally ok, because these are super easy to make, and relatively healthy, as far as things containing chocolate chips go. We're talking from starting to in the oven in like 5 minutes.

You read that title right - blender muffins. Absorb that for a sec....
I think I need to just bow out while I'm ahead with this one - I will never try another muffin recipe again. My children have declared these to be the best muffins they've ever had. And if you knew my kids, you'd know that they are pretty tough little food critics (my fault, I'm sure).

I've made a couple batches of these over the last week, and they are inhaling them as fast as I can bake them. But it's totally ok, because these are super easy to make, and relatively healthy (as far as things containing chocolate chips go), and fast! We're talking from starting mixing, to in the oven, in like 5 minutes.
They are fast to make because they are mostly made in the blender!
I know it's an unconventional way to make this type of recipe, but it totally works. I love baking stuff like this for my kids, but all the steps and multiple bowls, and waiting for butter to come to room temperature so you can slowly cream it with sugar.... it was kiiillllling me. I had to find an easier way. I am an instant gratification kind of cook. I like to whip it out and move on to the next thing. So this is just my type of recipe.
Also the amount of sugar in so many recipes is just crazy! We're not making cake folks, we're making muffins. If I'm going to put 2 cups of white sugar in something, then let's just be honest and call it cake. I love cake, but I'm not feeding it to my kids every day. With super sweet ripe bananas and some honey, all that sugar is just not necessary.
I think these work best as mini muffins, they are just a perfect two bite size, for a little sweet treat or snack. But full size muffins work great too. The whole wheat flour makes them feel really filling, and the little bit of yogurt adds moisture and just a hint of tang that balances out the sweetness really nicely. You can swap out sour cream if you don't have yogurt. Or add more banana.

Ingredients:
2 cups whole wheat flour
3 very ripe bananas
1/2 cup honey
1/2 cup (1 stick) butter
1/4 cup plain yogurt (I use whole milk Greek yogurt)
1 egg
1 1/2 teaspoons baking powder
1 teaspoon vanilla
1 teaspoon salt
2/3 cup mini chocolate chips
Directions:
Preheat oven to 350, or 300 convection. Grease muffin pans (we prefer mini muffin pans), or if you are using paper or silicone liners then just set them out.
In the container of your high powered blender, put bananas (broken into a couple of pieces), cold butter (cut up a little), honey, yogurt, vanilla, and egg.
Start out pulsing the blender to get it started. Stop and push the contents down if you need to. Pulse some more. Once the butter is starting to break up and the ingredients blend together, turn it up gradually. Blend just until everything is well mixed.
In a bowl, combine flour, baking powder, salt, and chocolate chips.
Pour the wet mixture over the dry and fold together gently just until all the flour is moistened.
Note: if you don't have a high powered blender, you can still make these! You'll just do it the old school way - let the butter soften, cream together with the honey, mix in the other wet ingredients (including mashed bananas), and then mix with the dry ingredients. They will still taste awesome, it will just take a little longer. So get yourself a blender, ok?
For mini muffins, I like to use a small cookie scoop to fill the muffin cups. I get the perfect amount every time and all the muffins end up evenly sized with no overflow.
Bake: 20 minutes for mini muffins. 30-40 minutes for regular muffins (depends on how big your cups are and how full you fill them). 1 hour for a loaf of bread.
If you're of the banana nut persuasion, you could totally add some chopped nuts to these. We just don't believe in mixing our nuts with our baked goods in this house. ;-)
Also, a hint: this recipe totally works with other mashed/pureed fruits too. I'm working an upcoming post about that, with a master quick bread recipe. But if you can't wait - just use this recipe, and swap out the bananas for any other pureed fruit, just make sure that it adds up to no more than 1 1/4 cups of puree, less if you're using something super wet (like apples). Leave out the chocolate chips and add nuts or raisins, and add a little spice.
Just a few ideas:
pumpkin muffins: pureed pumpkin, swap maple syrup for the honey, and add 2 teaspoons pumpkin pie spice
apple pie muffins: puree a couple of tart apples, and add 2 teaspoons cinnamon
carrot muffin: puree a couple of carrots & a zucchini, and add 1 teaspoon cinnamon
try other combinations - banana + zucchini, pear + carrot, apple + carrot
(Links contained here are affiliate links. If you purchase something from a product link I've provided, I get a small commission. It doesn't cost you any more, but it helps me keep the lights on here.)

How to Make Almond Milk
Do you want to know how to make your own almond milk? Please say yes - you won't regret it - because this is too easy, and it tastes so good!
I've been making my own almond milk for a while now. I love having it in my morning coffee - it gives the milkiness I like from putting milk in my coffee, and just the right amount of sweetness, but somehow seems lighter on the stomach. I also love using it in my kid's smoothies.
When I made it the first time I was completely blown away at how easy it was. I couldn't believe I'd been holding off on making nut milk, for some reason thinking it would be too much work. So wrong!
As with anything I do, of course I have to tinker with it. I might start by following somebody else's recipe, but I tweak and change until I've figured out the way that works for me. You can google around and you'll find plenty of recipes for homemade almond milk, the variety is quite surprising actually, given how simple it is. So what we have here is the method I've been using that's working well for me. One of my goals when messing with a recipe is to figure out how much I can simplify the process, while still getting the best possible flavor. I try to cut out any unnecessary steps and just get it down to the most efficient process possible. I've also experimented with different amounts of water, and different combinations of sweetness and flavor. One of the things I have learned for sure is that having a great blender makes a HUGE difference in how creamy your milk will be. I use my Vitamix to make my almond milk. Once you try homemade almond milk made in a high powered blender like this, you will never want to go back to store bought.
So now I'm sharing with you my recipe - I think it's about as easy as you can get, and the flavor is great.

What you'll need to make about a quart of almond milk:
1 cup of raw almonds
Dates, or other sweetener (I'm using 2 medjool dates. If you use smaller dates you might want more. Or you can use honey, or any other natural sweetener you like)
About 4 cups of water, maybe slightly more
Other flavorings as desired (vanilla, cinnamon)
A high powered blender
A nut milk bag or some cheesecloth and a strainer
A glass bottle or other storage container.
Note that I have tried doubling this to make more than a quart at a time, but my blender doesn't quite hold enough to allow for the doubled recipe and still have room to really blend it up. So one quart at a time it is. But it's so easy, that it's really not a problem to do this a couple times a week.
How to make almond milk:

Measure out 1 cup of almonds. Put them directly in your blender container and fill with water up to the 5 cup line. This will end up being just a little over 4 cups of water.

Let soak overnight. The next day the almonds will have swelled a little and the water will look a little murky. Some people strain them at this point and start over with fresh water. I've tried it both ways and I think switching the water is not necessary. It maybe gets you a slightly whiter milk, but the flavor is the same so why not skip that step. This is why I just start out soaking right in my blender - no need to dirty another vessel, no need to drain or do anything else at this point.
Drop in your dates and/or any other sweetener or flavoring you like. Some people like vanilla, some also add a little cinnamon. Some do honey instead. It's really all about personal taste and I've found that the dates alone give me just enough of a clean sweetness, so I like keeping it simple. Don't forget to take the pits out of the dates!
Blend it all up on high power. I like to let it go for a minute or two, to really get the almonds as pulverized as possible and get every bit of flavor out of them.

When it's as blended as you think you can get it, get your straining setup ready. I bought a nut milk bag which makes it so easy. I just set my bag down in a bowl.
But before I got the bag I would set a strainer over the bowl and line it with a couple layers of cheesecloth. Both methods work just as good, the nut milk bag just makes the process a little easier and faster.

Pour everything from your blender into your strainer.
Gather it up and let it start to drain.

I hang my bag from a cabinet knob, so it easily drains right into my bowl. With the nut milk bag you can let it drain for just a few minutes and then squeeze the rest out. The mesh is fine enough that you can squeeze pretty hard and none of the pulp gets through. This satisfies my need for instant gratification - I can't stand waiting for it to strain.
If you're using a strainer and cheesecloth you'll want to just walk away and let it drip for a while, maybe a couple hours - if you do too much squeezing with the cheesecloth you will start to get some pulp coming through.
And that's it! Pour milk into a jar, chill, and enjoy! The first time I made it I couldn't believe how easy it was, and also how creamy and milky it was. If you like store bought almond milk, you're going to absolutely love this! It will separate as it sits in the fridge, so you'll just need to give it a good shake before you pour some.

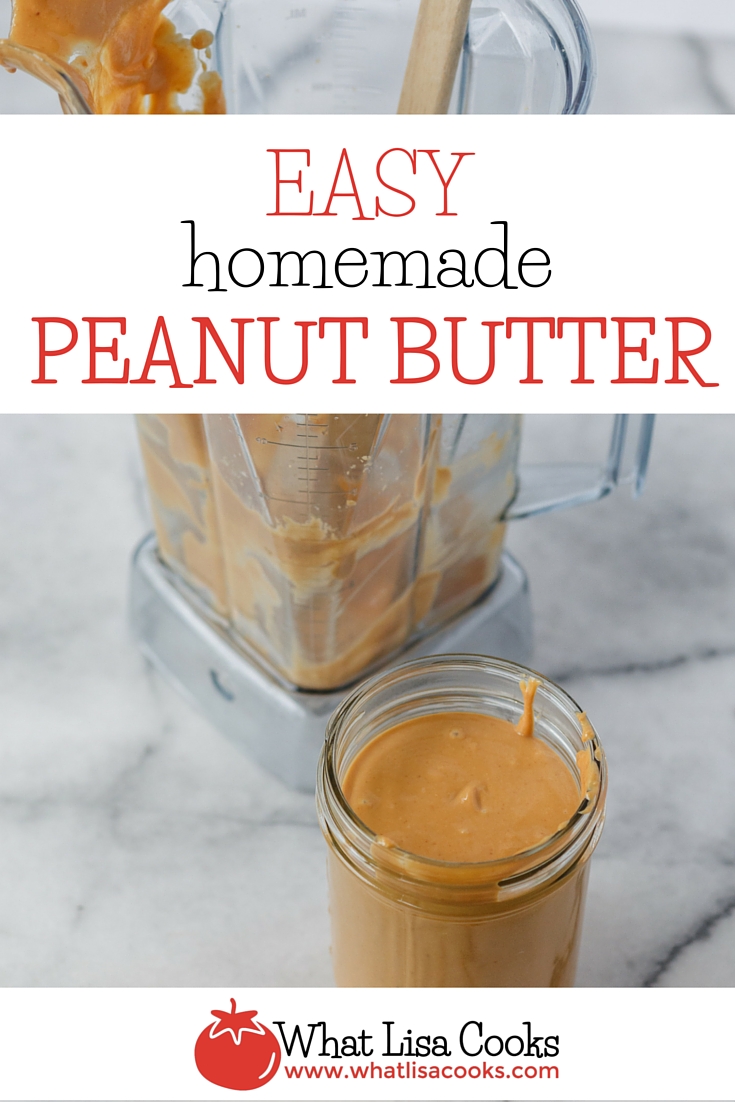
Quick and Easy Homemade Peanut Butter
I really had no intention to make peanut butter. Don't get me wrong, I love the idea of homemade nut butters. I've done sunbutter before, and it was great. But I try to prioritize my time and making all my nut butters at home has never really made it to the top of my list of things I should be doing.
But I love peanuts. I mean, I love roasted, salted peanuts. A quick handful or two is an awesome snack - it satisfies my need for crunchy and salty, and gives me a little protein. I bought some peanuts a couple weeks ago, thinking I was buying roasted and salted peanuts. Only to get home and realize that what I had grabbed was roasted and NOT salted. (That's what happens when you're trying to squeeze in a quick grocery trip in between pickups and dropoffs.) As far as I'm concerned, there is no place in my life for snacking on nuts that aren't salted. I know you raw nut lovers can disagree, but I love my salt.

With four kids, we go through a lot of peanut butter in this house. I buy lots of it, but sometimes it's fun to figure out how to make some of our everyday things from scratch.
And I can definitely tell you - once you've had fresh homemade peanut butter, you will not want to go back. Especially if you can make it with fresh peanuts. I recommend buying them from the bulk bins at someplace that goes through a lot of bulk food, so you know they haven't been sitting around for very long.
Not only does it taste amazing, but it's so easy!

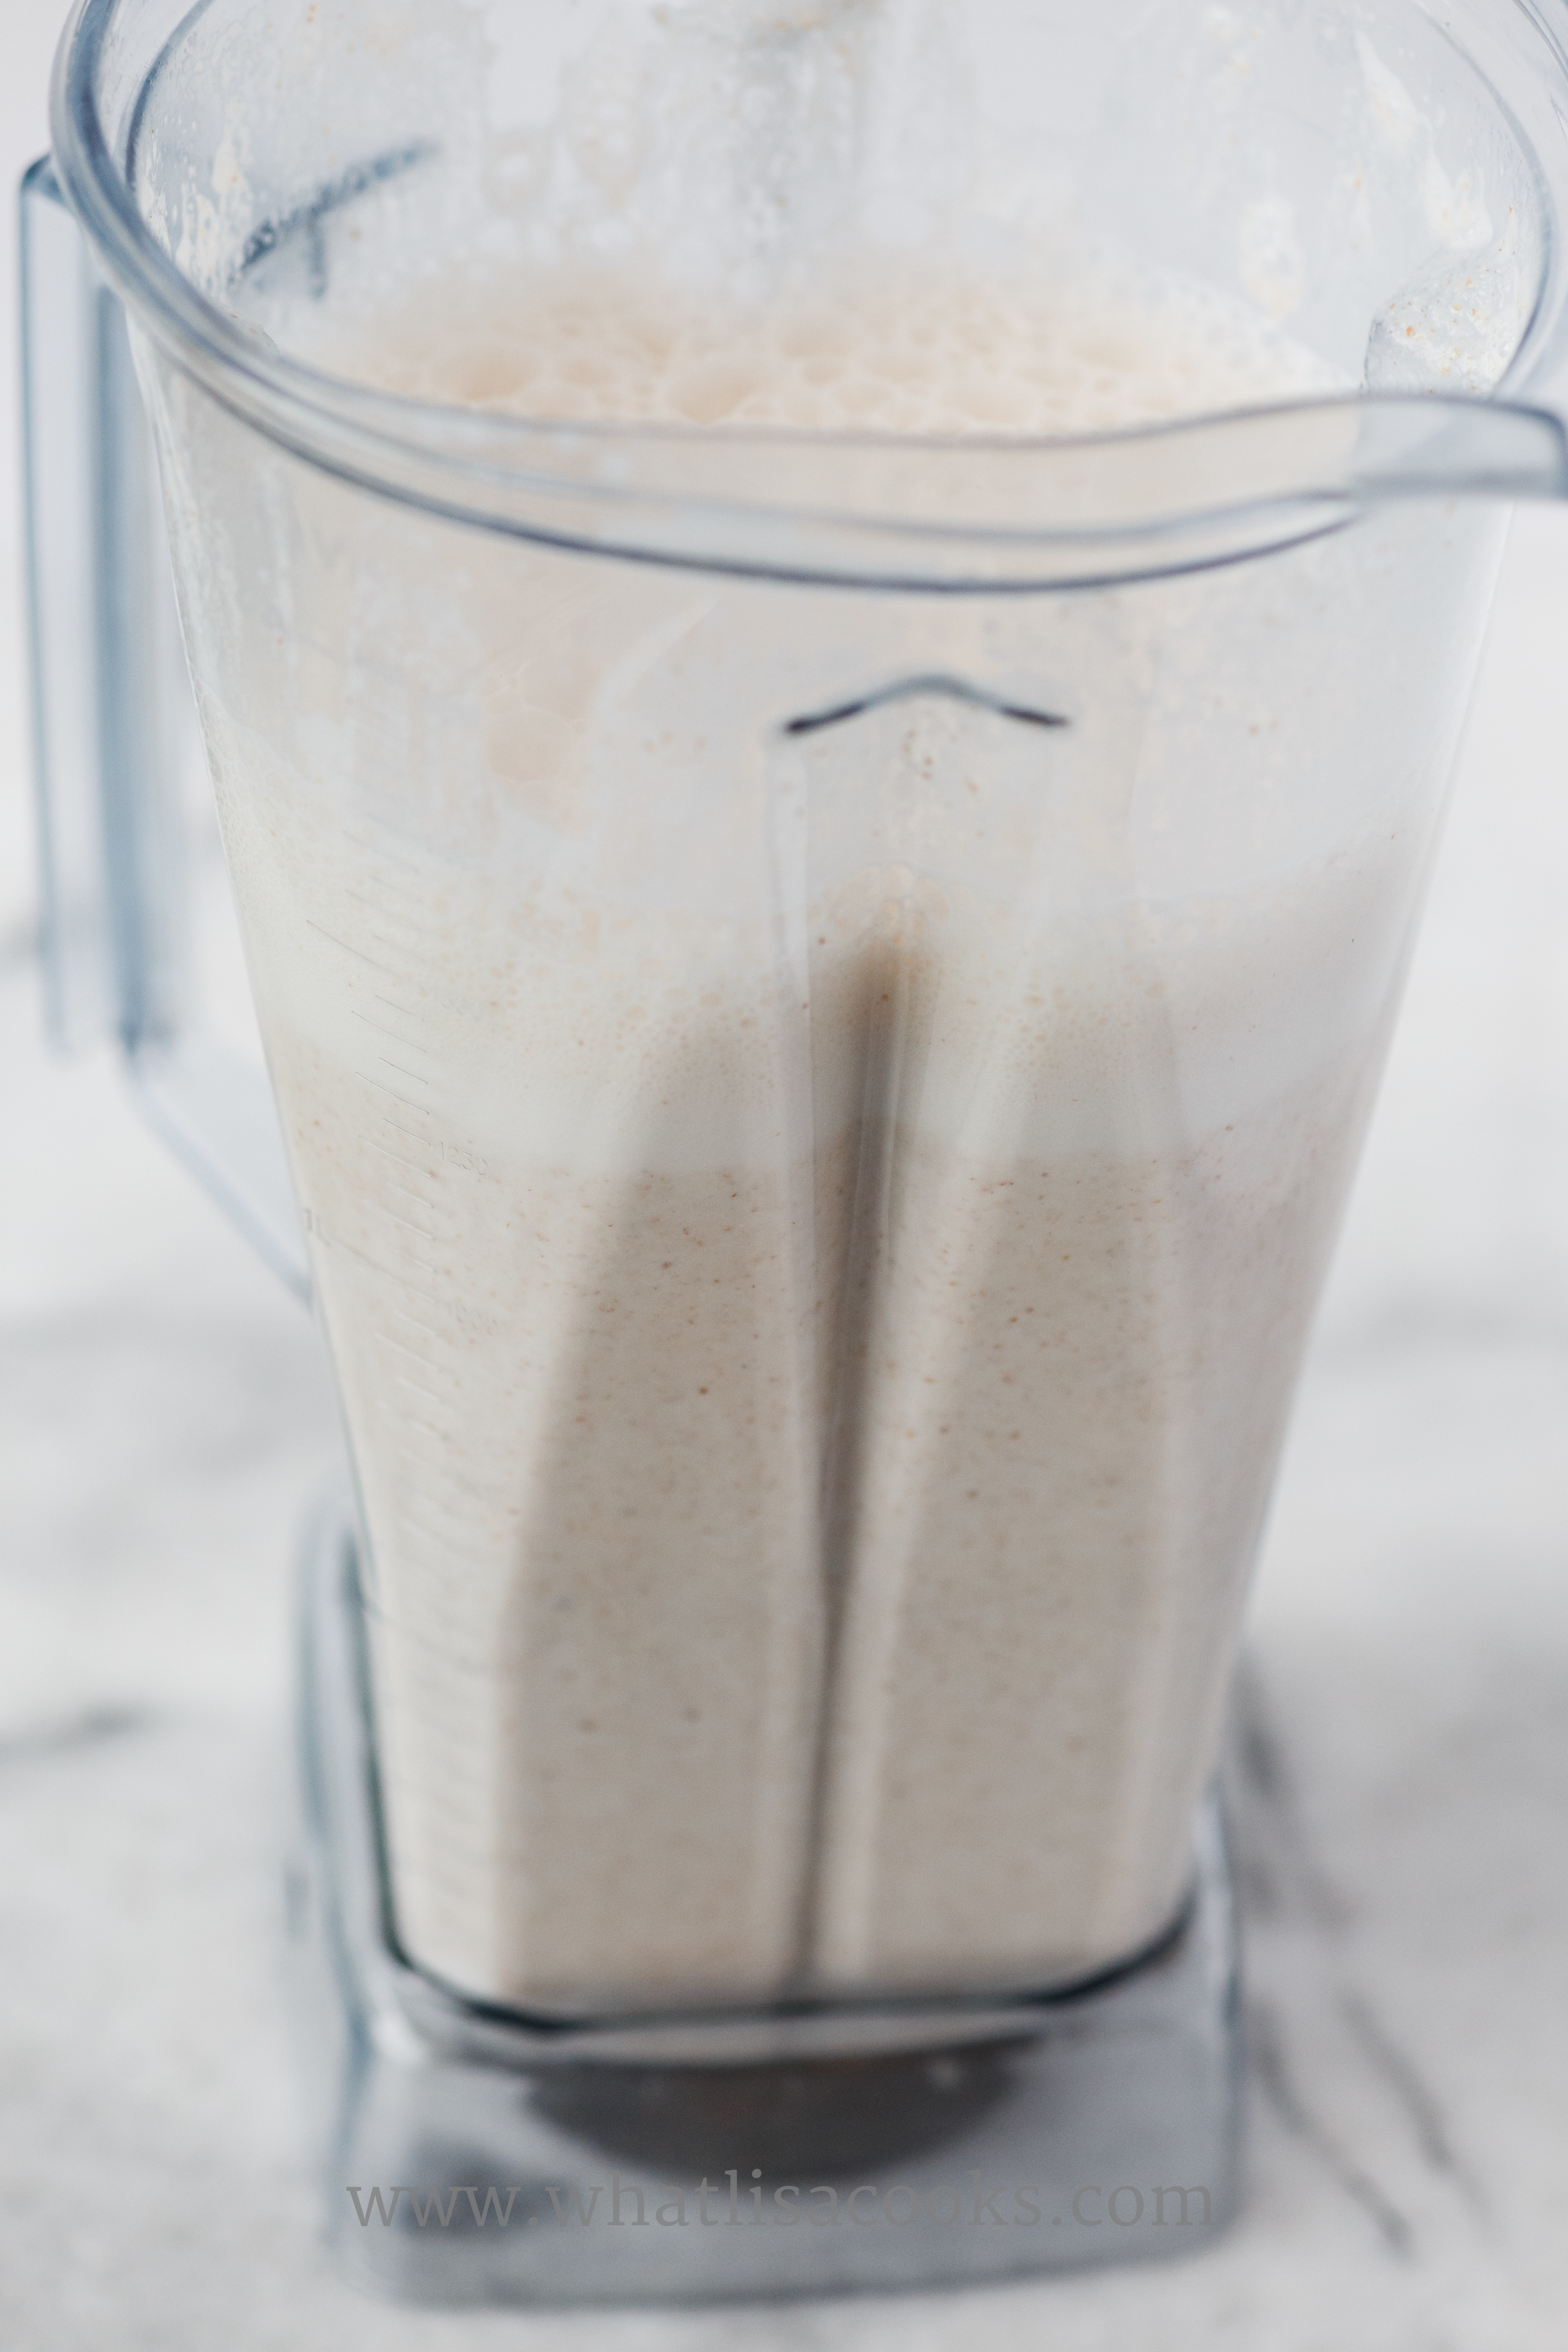
Basically, I took a pile of peanuts and dumped the whole thing into my Vitamix, added a dash of salt, and voila! Peanut Butter.
Ok, it wasn't quite that magical.
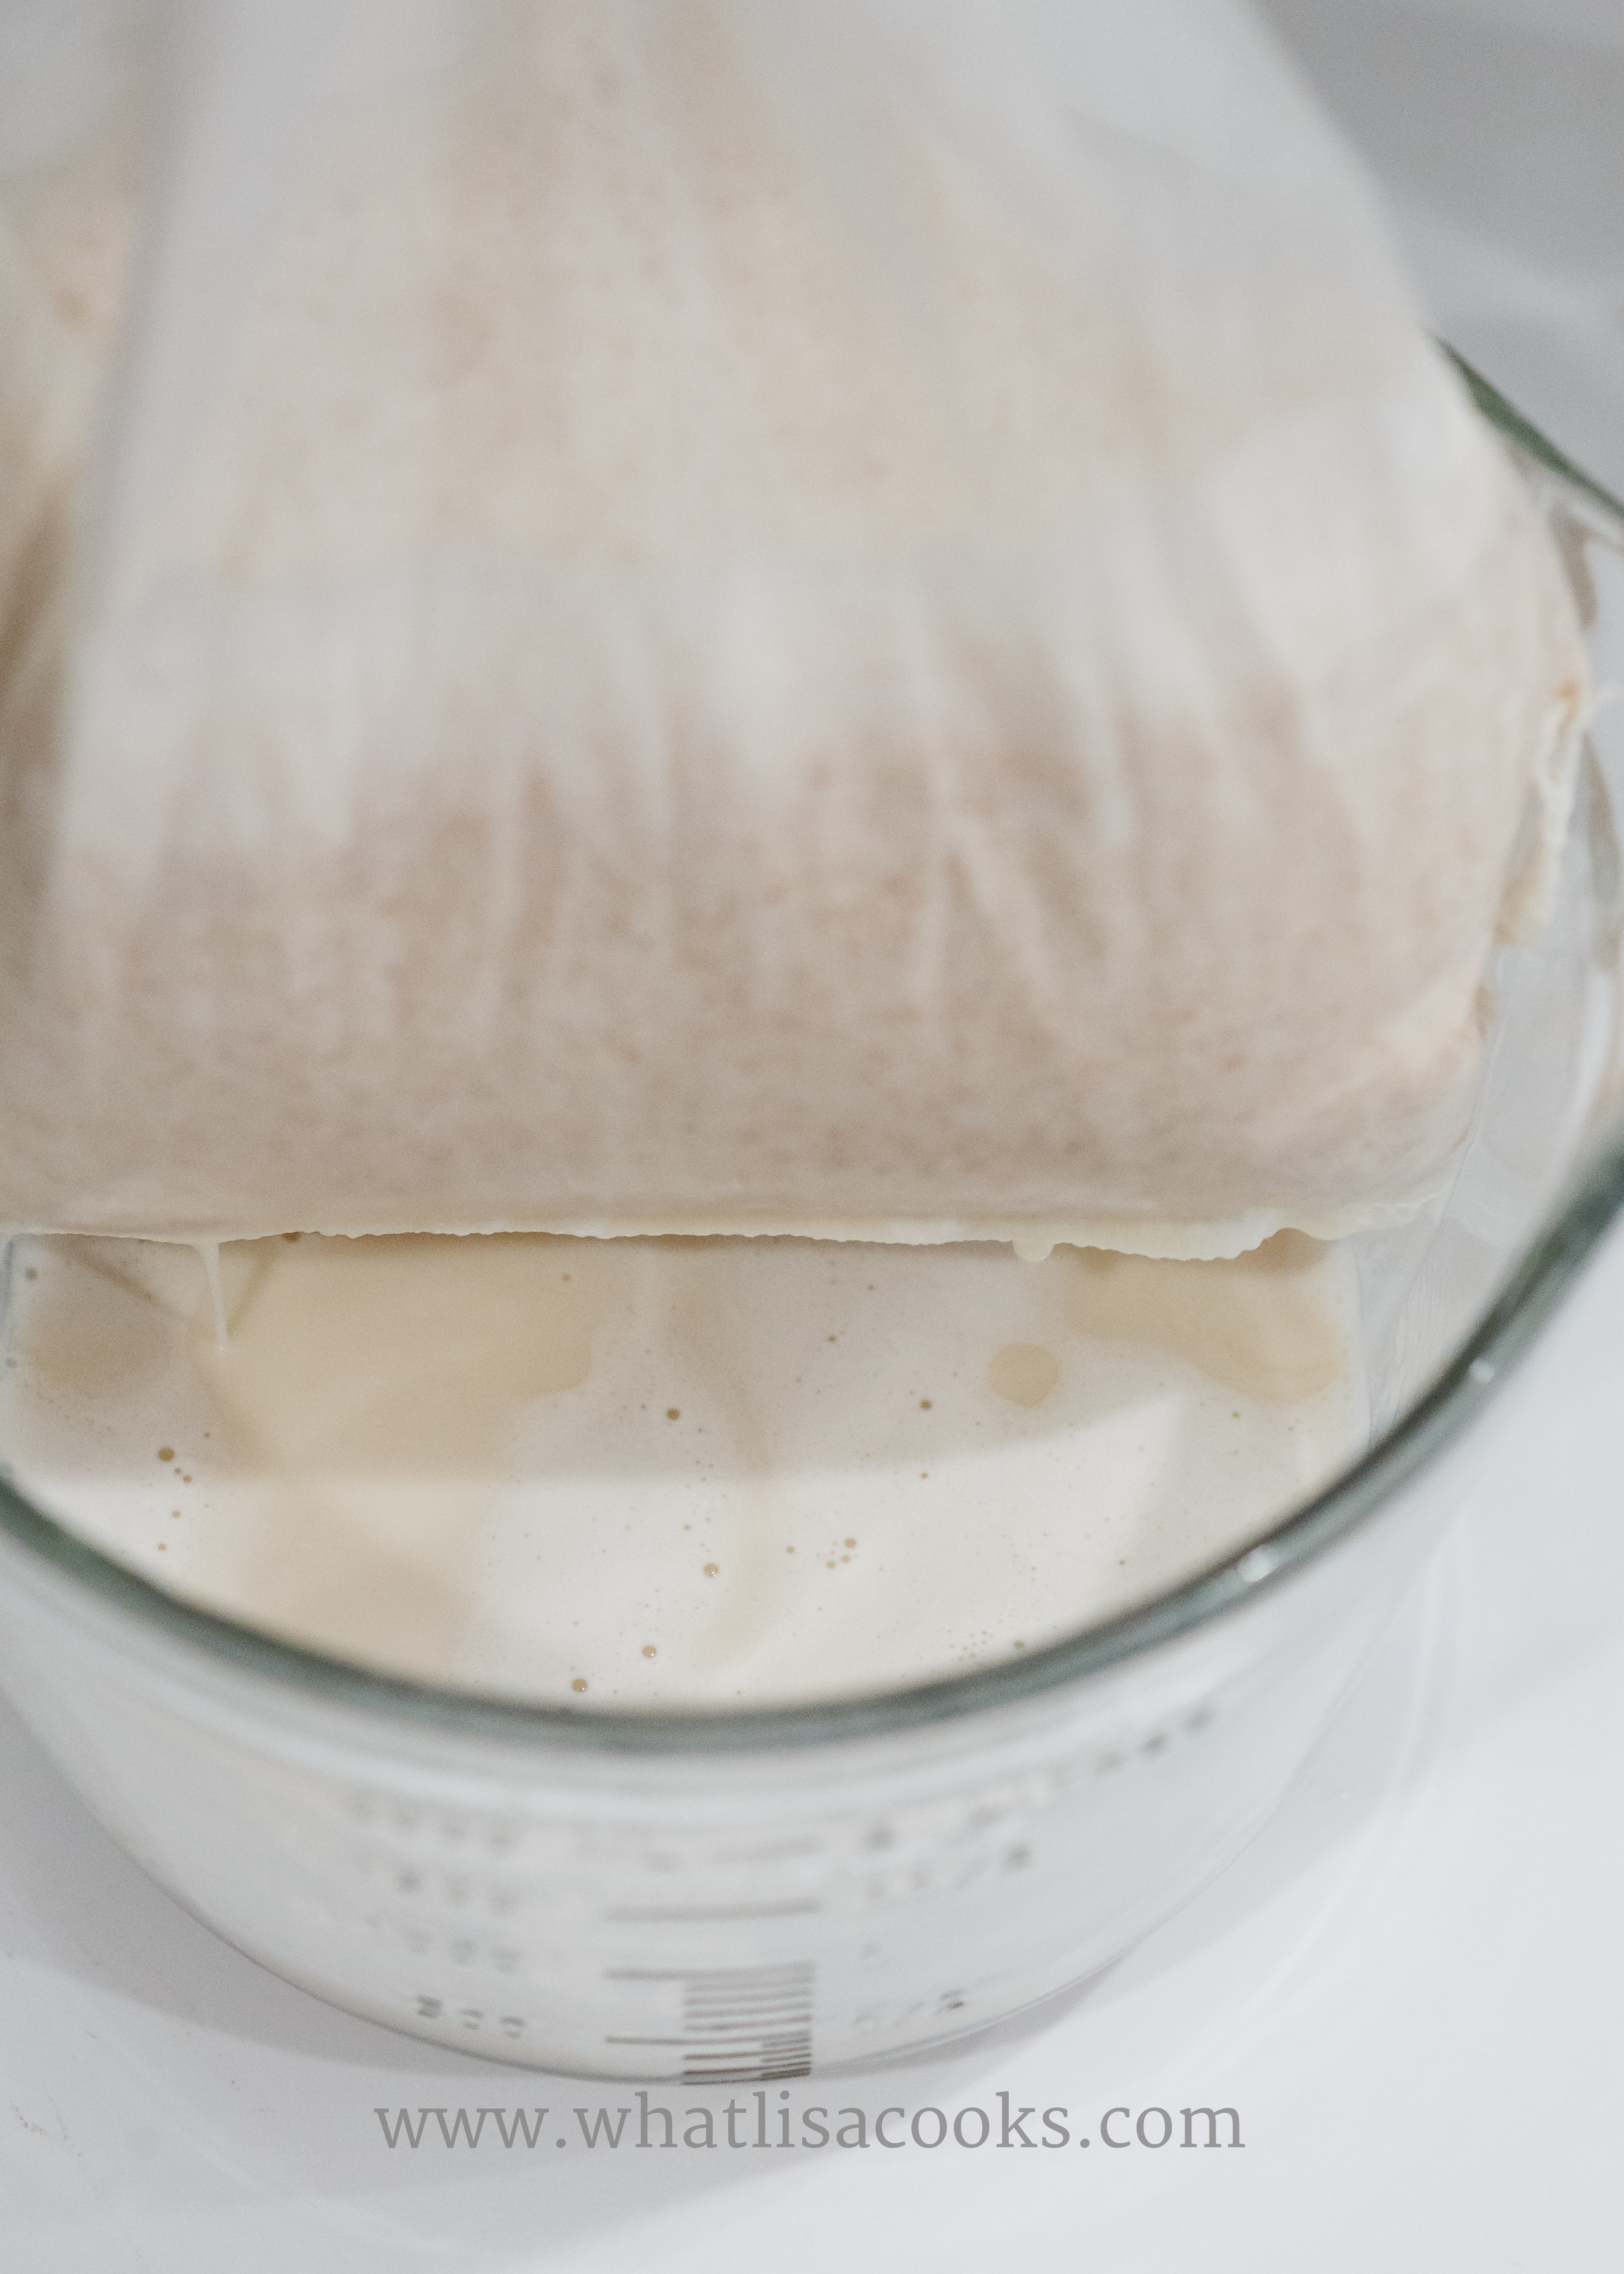
But it was close. I had to coax it along at first - pulsing off and on, pushing it down several times. But once it got going and all that oil was released, it very quickly turned into a super smooth and almost liquid consistency. Amazing how something that seems so dry can turn into liquid! And the whole process took less than 5 minutes.
Ingredients:
1 pound roasted shelled peanuts.
1/2 teaspoon (or so) kosher salt.
A drizzle of honey to taste (optional)
Directions:
Put peanuts and salt in blender. Pulse and push down until the peanuts start to release their oil. This is the only slightly labor intensive part. It takes a bit of coaxing to get it going. But once they start to release their oil then you can move faster, and blend to the consistency you prefer. We like creamy peanut butter here, so I really let it go until there were no chunks left. Once you think it looks good, taste it. At this stage you can add a little honey if you like your peanut butter lightly sweetened (most popular commercial peanut butters have sugar in them), and you can also add a little more salt if you like, and then just blend long enough to get that well mixed in.
Pour in a jar, let it rest to firm up just a bit, and then get out the bread and jam, because you're going to want to make a sandwich.
Also note - you can follow this same technique with basically any kind of nuts or seeds. I've also made sunflower seed butter this way, and it tastes great. If the seeds or nuts you buy aren't already roasted, then you'll want to either roast them in the oven or toast lightly in a pan first, to really bring out the flavor.

Video: A tour of my fridge
A quick snapshot in time - a video tour of the fridge.
Occasionally folks ask what I keep in my fridge, so rather than write a long post about it (no time!) I thought I’d do a quick video for you.
So here you go - a video tour of what’s in my fridge! Enjoy!
If you have any questions or want to know more about anything you see here - post a comment on this post or on this same video on my facebook page.
Free Christmas Printables
A couple of quick printables I made for my kids for holiday fun - one is a wish list and the other is a sort of holiday bingo.
Free Christmas Printables For Kids
I made up a couple of quick printables for my kids for this December & holiday season, so I thought I’d share them here with you.
Click the image to download and print
Christmas wish list printable
The first thing here is a free Christmas wish list printable.
I like the ideas I’ve seen folks talk about that focus on four gift ideas - something they want, something they need, something to wear, and something to read - so I went with that structure.
I also wanted to encourage them to think about someone else this Christmas, so I added a section for add their thoughts about a wish for someone else.
You can click on the image to get to a downloadable and printable pdf.

click the image to download and print
December Kindness Bingo
The second one is a fun little Kindness Bingo activity for the month.
I wanted something to help get us in the spirit of kindness and giving this year, without spending a lot of money. looked at a bunch of “random acts of kindness” things for kids online, but frankly they all looked like a whole bunch of work for me.
I wanted to come up with something that would get my kids thinking of and being kind to others, without just straight up creating a lot of extra work for myself. I’m exhausted enough as it is.
So I came up with this. They are mostly things the kids can do at home, independently, with supplies we already have. The younger ones might need a little help with a few these, but I mostly tried to add things that I knew my kids were capable of doing on their own. I wanted this for two reasons - one, because it’s less work for a lazy/tired mom; and two, because I think the act of kindness means a lot more when it’s really their own work.
I hope you have a wonderful holiday season and have some fun with these!
Gold Rush Cocktail
The perfect summer cocktail - it’s like summer’s version of the Hot Toddy.

This is my current favorite cocktail - it's just perfect at the end of a long day with the kids, when I feel like I want something a little more special than just a glass of wine.
This seems like a high end bar cocktail, but it's super easy to make. It's similar to a whiskey sour, but with honey. Or, think Hot Toddy, but not hot!
A "Gold Rush" Cocktail - for two:
- 2 ounces lemon juice (or we're using a combo of lemon, orange, and grapefruit)
- 2 ounces honey syrup (just equal parts honey and water, melted together and then cooled)
- 4 ounces whisky (the one in the picture was Rye)
This is enough for two drinks. If you want to just do a little math, you could double or quadruple or even more, and mix up a pitcher of this and put it in your fridge. It's super quick to make if you already have your juice and syrup ready - I do those and just keep them in jam jars in the fridge.
I like to shake it up in a cocktail shaker with a little ice, and then pour over more ice in a glass. If you want to feel a little more fancy, get some molds for making a big ball of ice. These are also nice because your ice doesn't melt and water down your drink as fast. Or you could shake it will with ice and pour in a martini glass.
Cheers!
Chicken nugget meatballs
A few weeks ago I had an idea to make some simple chicken meatballs. Most of my kids will eat meatballs, so it's usually a good easy weeknight meal for us. With some pasta and a salad, we've got a good dinner and it isn't much work. But I wanted to lighted them up a bit this time, so I thought I'd make them with chicken instead of my usual combination of beef & pork (or frozen!).

And in doing so, something magical happened...
I mixed these up and started browning them, and tasted one. I realized that it tasted an awful lot like a chicken nugget (in a good way!). I have one super picky child who eats nothing, but chicken nuggets are on her very short list.
So I asked her if she would be willing to taste this thing I just made that tastes just like a chicken nugget.
She agreed. And she liked it! I was giddy!
If you have an extreme picky eater, then you understand the joy you feel when you discover something they will eat that is homemade and relatively healthy.
I've made homemade chicken nuggets before, but it seemed so labor intensive that I didn't do it again. They had to be shaped like nuggets, and rolled in breading - a lot of work for nuggets. But for these I just used a cookie scoop to get the rough balls, and then finished rolling and dropped in a pan with some oil. I think because they had bread crumbs in the mix then they had a feeling of a crust, without having to actually crust them. It was easy and quick!
My original plan had been to plop all of these in a pot of sauce to finish cooking, but since she liked them I decided to not do that. I instead cooked them through and then put in a couple of oven proof dishes. I kept one dish of them plain, and the other I topped with sauce & cheese - so it had a bit of a chicken parmesan taste to it.
This is definitely one of those guideline type of recipes. This is the approximate ingredients that I used, but these quantities are not mandatory and really it's more of an eyeball type thing.
Ingredients:
- ground white meat chicken - around 2 pounds
- Italian style seasoned bread crumbs - a cup or so
- eggs - 2 or 3
- garlic powder - a teaspoon or so
- onion powder - a teaspoon or so
- fresh ground pepper
- oil for cooking
Directions:
Mix all ingredients together except the oil. The consistency should be bit like dough - you should be able to form it into shape without it falling apart or seeming too wet. It's the combination of bread crumbs + eggs that help hold this together. If your mixture seems too wet, add a bit more bread crumbs. Too dry, add another egg.
Generally for this kind of thing it's a good idea to cook a little bit to taste and check for seasoning before you cook the whole lot. Seasoned bread crumbs can often have a lot of salt in them, so I wouldn't salt this much if at all until you've tasted. Pinch off a bit and put it in a hot pan to cook, and then taste. Then add salt as needed. Then when you are happy with the seasoning you can shape into meatballs. I use a small cookie scoop, drop the scooped bit into my hands, finish shaping into a ball, and then put in my pan.
Brown on all sides in a pan with a bit of vegetable oil over medium heat. They likely won't be cooked all the way through, so you'll need to either turn down your heat and cook for another 5-10 minutes, or you can put them in the oven at 350 for 10-15 minutes.
You could also cook these from star to finish in the oven - I'd do a foil lined baking sheet, at 350 for probably 20-30 minutes.
We had ours with sauce & pasta. They'd be great just dipped in ketchup too.
Enjoy!
Butter Cookies
I came up with this cookie recipe a while back, and it only just came to me that I never shared it. These are melt in your mouth delicious, and super easy to make.

Enjoy!
Easy and Healthy "You Choose" Lunch Platter
Here's the thing about kids: just when you think you've got them figured out, they surprise you.
Do you think your kids would totally turn their noses up at real, healthy foods for lunch or snacks? Are you convinced that they would refuse to eat unless you give them a plate full of processed food? Give them a little more credit, you might be surprised.
My kids are no different than most other kids - if I put out a big bowl of goldfish crackers they will devour them in no time and then ask for more. But you know what happens when I put out a big plate of healthier stuff instead? They devour it in no time and ask for more. And most of the time it never even occurs to them to ask for some crackers to go with it.
A big platter of bite sized real foods is one of my favorite things to give my kids for lunch or snacks at home. We do this a lot in the summer and on weekends. My kids love this kind of meal, and I do too. Kids love feeling like they have control. So if you give them a variety of choices, they get to feel like they have some control over what they choose for their meal. And it's great for me because it's easy - you just cut a bunch of stuff up and put it out there. Everybody gets to have their own custom lunch, but I'm not having to make a custom lunch for each of them. A lot of times on the weekends I will put out a tray like this around lunch time and just occasionally refill it throughout the afternoon. I'm totally fine with my kids grazing and snacking all afternoon, as long as what they're snacking on is real, healthy food. Sometimes I give them some boundaries (you have to choose at least 1 protein and at least 1 vegetable), and sometimes I just let them choose whatever they want from the plate, knowing that everything I put out was healthy so I'll be happy with whatever they choose. Not everybody will eat everything, but I know there are at least a couple things that each of them like and they all end up getting a good quality meal. And over time, they might even venture out and try something new too.
It's a total win win!
The possibilities are endless with what you can include. It's a great way to use up little bits of stuff from the fridge, if you don't have enough of any one thing to make a whole meal out of. I try to always include some protein, some fruit, and some veggies, but beyond that it's a little different every time just depending on what I have.
Here are a few examples of what we've had recently:

Carrots, hummus, oranges, ham, apples, almonds, cucumber, and tomatoes.

Carrots, sugar snap peas, prunes, cashews, cheese.

Cubes of ham and cheese, carrots, grapes, eggs, raisins, almonds, banana chips.

Apples, bananas, carrots, cheeses, salami, boiled egg, blueberries and a few crackers (that was all the crackers I gave for four kids to share).

Apples, blueberries, carrots, three kinds of cheese, guacamole, boiled eggs, salami.
Can you color brown eggs?
Yes! You totally can!
I think we all got in such a habit of dying white eggs that we've just been convinced that brown eggs won't work. But they definitely do, and I think they make some of the prettiest colors. You have to let them sit in the dye a little longer to get the color to really soak in, but the wait is worth it. You end up with beautifully rich colors that I think look more "earthy" than the same store bought egg dye applied to white eggs.
We did a little comparison - these eggs were all dyed with the standard old store bought egg dye, mixed with vinegar according to the package instructions for vibrant colors. The group on the left are brown eggs (except the blue row), the group on the right are white eggs. (and all the little white marks are just where my kids drew on the eggs with the wax crayon).
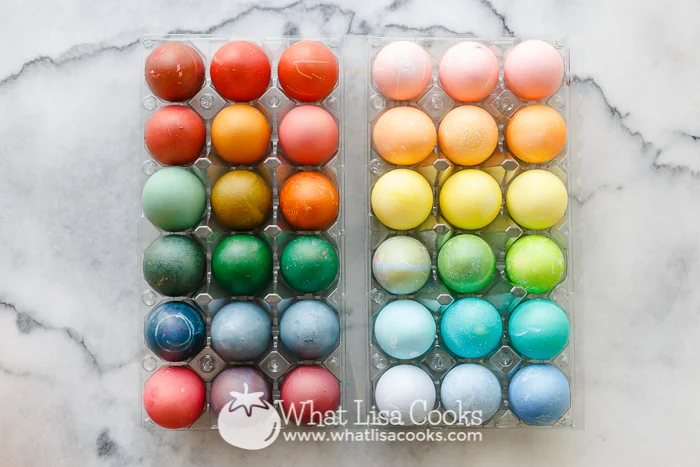
Brown eggs are usually more expensive, so I don't know that I would go out and buy them just for Easter egg dying. But if you have them and weren't sure if you could use them - go for it! I absolutely love how they turned out.
Homemade "instant" oatmeal
It totally kills me that my kids prefer those instant oatmeal packets over real cooked oats. But lately I'm really trying to focus on choosing my battles, and trying to force people to learn to like oatmeal with some texture over the creamy, mushy stuff, just seems like a fight that's not worth fighting at this stage, especially on an already manic school day morning. But instant oatmeal packets have all kinds of strikes against them, and I just can't bring myself to buy them any more. The artificial flavorings in so many of the mainstream brands, the amount of sugar, and the cost - with 4 kids eating two packets each, we would use whole box at one meal. I have bought some organic ones before, which are a little better, but they still have so much sugar and are even more expensive. I had seen several mentions on various food blogs and pinterest boards about making your own, so I thought I'd give it a try.
It totally kills me that my kids prefer those instant oatmeal packets over real cooked oats. But lately I'm really trying to focus on choosing my battles, and trying to force people to learn to like oatmeal with some texture over the creamy, mushy stuff, just seems like a fight that's not worth fighting at this stage, especially on an already manic school day morning. But instant oatmeal packets have all kinds of strikes against them, and I just can't bring myself to buy them any more. The artificial flavorings in so many of the mainstream brands, the amount of sugar, and the cost - with 4 kids eating two packets each, we would use whole box at one meal. I have bought some organic ones before, which are a little better, but they still have so much sugar and are even more expensive. I had seen several mentions on various food blogs and pinterest boards about making your own, so I thought I'd give it a try.
There are lots of different versions of recipes out there, some of which are no healthier than the store-bought ones, calling for things like non-dairy creamer and way too much sugar. But I did find a few that I liked. I can't seem to find the exact page that I got the final recipe from that I ended up using, I'll certainly link back to it when I come across it again. But I don't think it was a totally original recipe anyway, as so many of them have the same basic proportions in common.
Homemade Instant Oatmeal
- 10 cups of quick cooking oats (I use this brand - 10 cups was almost the whole bag, so I think you could use the whole bag and be just fine)
- 1 teaspoon salt
- 1 cup brown sugar (I actually substituted coconut sugar because that was what I had, and I really like the flavor). Use more sugar if you know you want it sweeter, but I like the idea of keeping it less sweet to start, and then I can add a little maple syrup if someone really wants sweeter.
- 2 teaspoons cinnamon
- 1 cup powdered milk (I use this organic one).
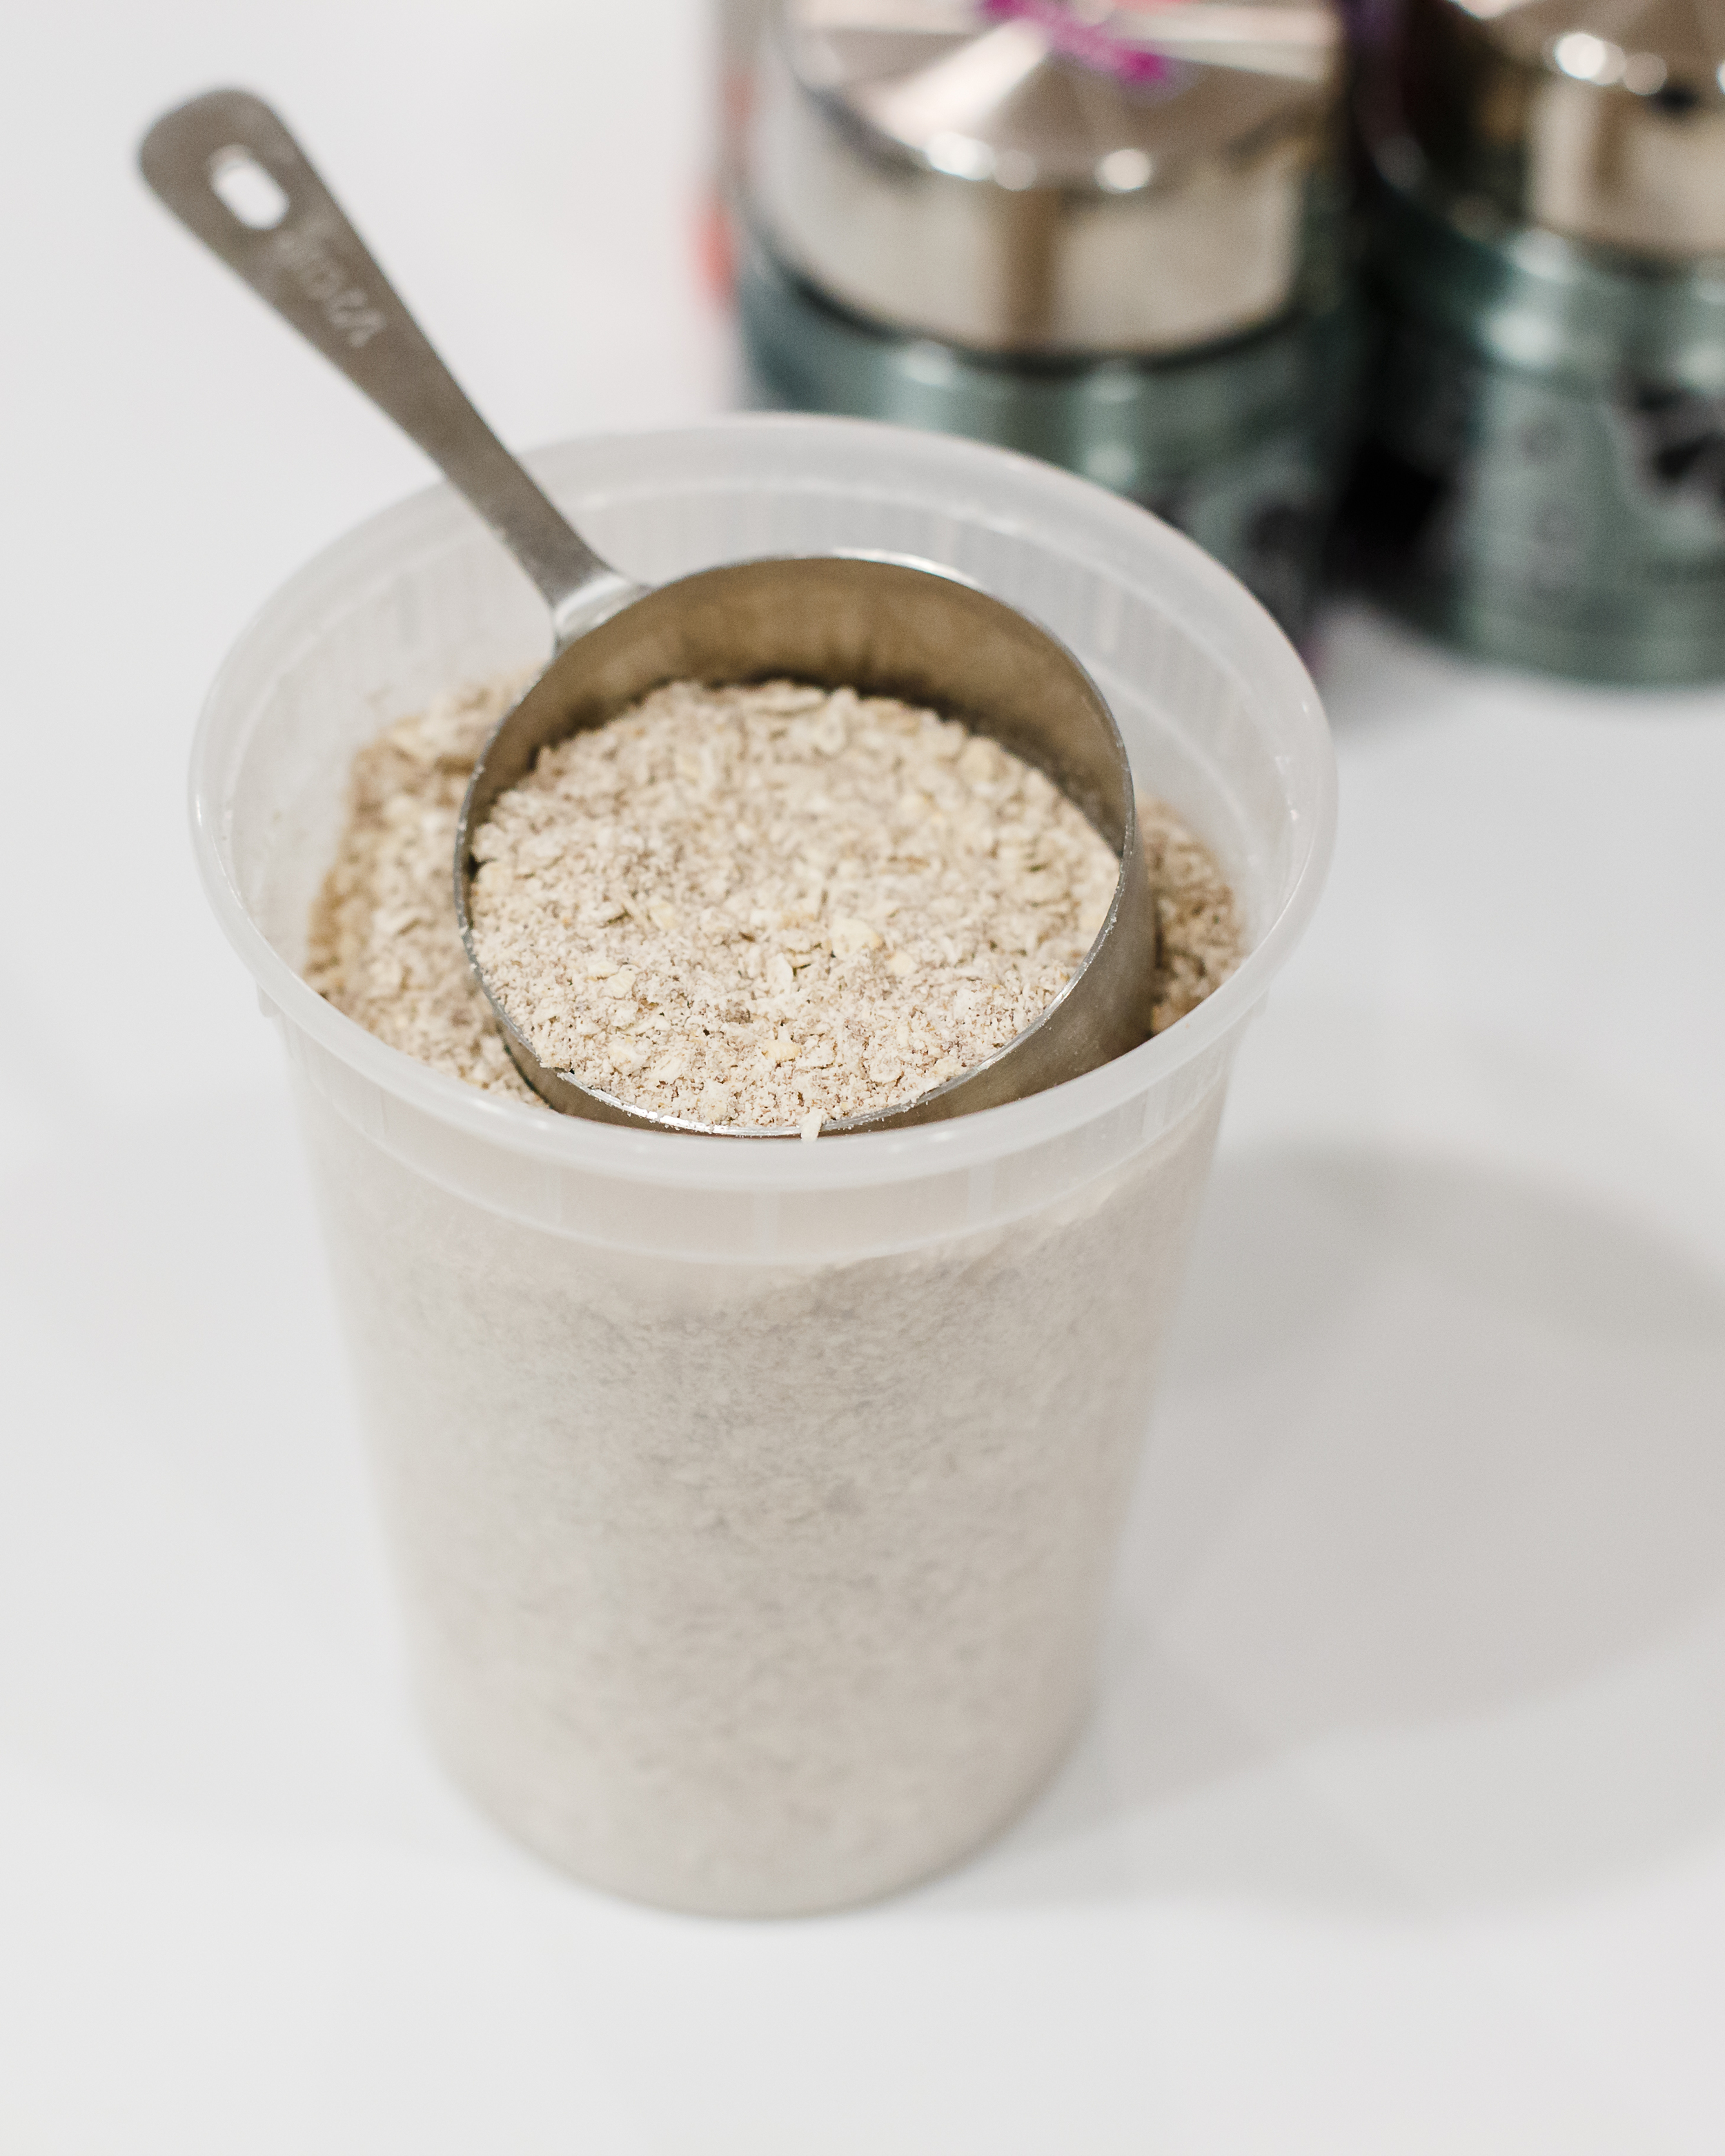
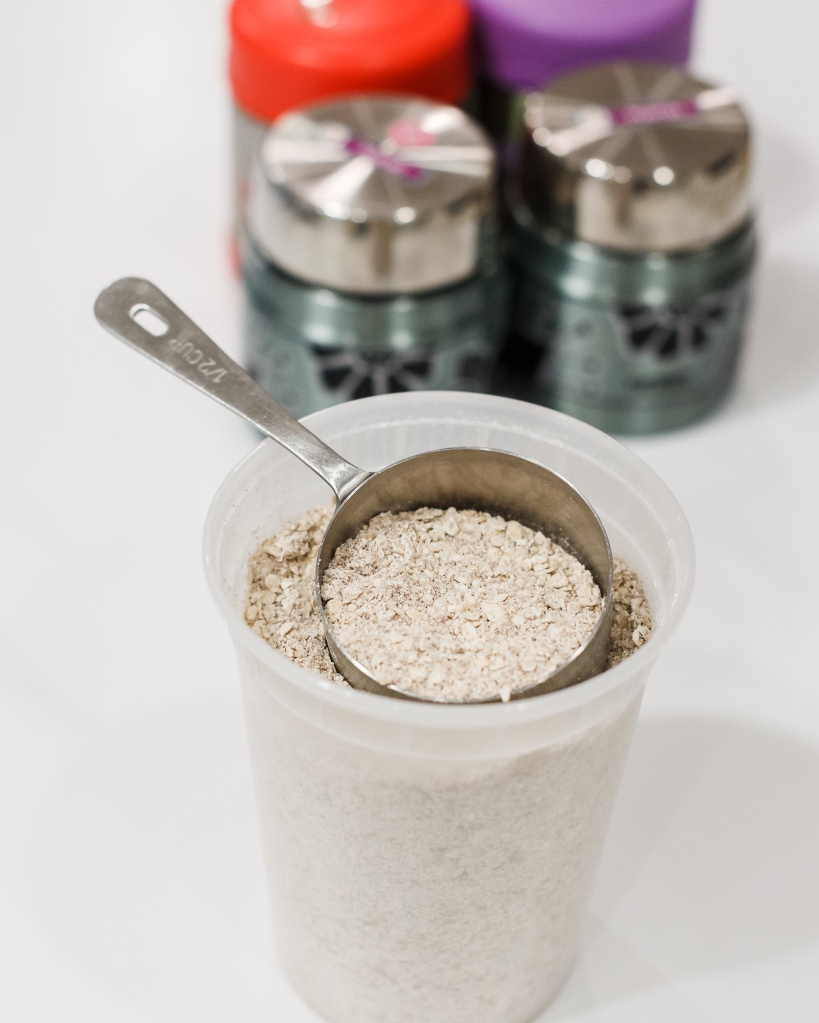
Here's the key that all the good recipes seem to have in common: some of the oats need to be blended and broken down - that is what gives the softer consistency. So, put 4 cups of the oats in your blender or food processor and blend until almost like flour. Then just mix all the ingredients together. That's all.
I think you could easily go ahead and add in some chopped up dried apples or apricots, or nuts, at this stage as well. Given how fast I think we'll go through it, I think it would keep just fine. Maple sugar would probably be really good in this, or vanilla sugar too.
Most of the other recipes out there have you portion it out in 1/2 cup servings in individual snack bags. But I thought that seemed like way too much waste, so I just put it all in a couple of big containers and I measure it out when I am ready to serve it. I also thought for home use you could just as easily measure out your portions into pint sized jam jars, and then just add your water and serve right out the jars. For eating right away, using equal parts water to the dry mix seems about right, which I think would be the same as the packets. But I've noticed that instant oatmeal tends to get thicker as it sits, so if making ahead for lunch I would add a little extra water, so it's not too thick by lunch time. Maybe 3/4 water to 1/2 cup dry mix. I also like to add just a little cream or half & half to the finished oatmeal.
I made this last week and my kids ate it up for breakfast. And today I used it for breakfast for lunch (which my kids love). I measured the mixture out the night before, and just added hot water this morning when I was ready to pack up the lunches.

Enjoy!
meal plan #12: one month family dinner plan
Full month meal plan for the family.
A meal plan for a family using a monthly meal planning template.

Drum-roll please....My meal plan for four weeks.
Yes, four weeks. I know, you're thinking "how does she do that?". But honestly I find it to be easier than having to figure it out every week. I don't do this because I am super mom. I do it because I am lazy, and I don't like having to do the same work over and over again every week.
I figure it out once, and I'm good for a month. And if I don't feel like doing it again, I can just use the exact same one. It's been a month since we've had these meals, so they will all seem fresh again. Seriously I think you could probably use the same four week meal plan all year long, and maybe just make a few seasonal adjustments (like, I'd take out the soup in the summer and maybe do a salad bar instead, and I'd probably swap the roast chicken for grilled chicken).
We are in the middle of this right now, I'm just a little behind on posting. It's working really well so far and making my life a lot easier. For some reason, printing on colored paper just makes it seem more important.
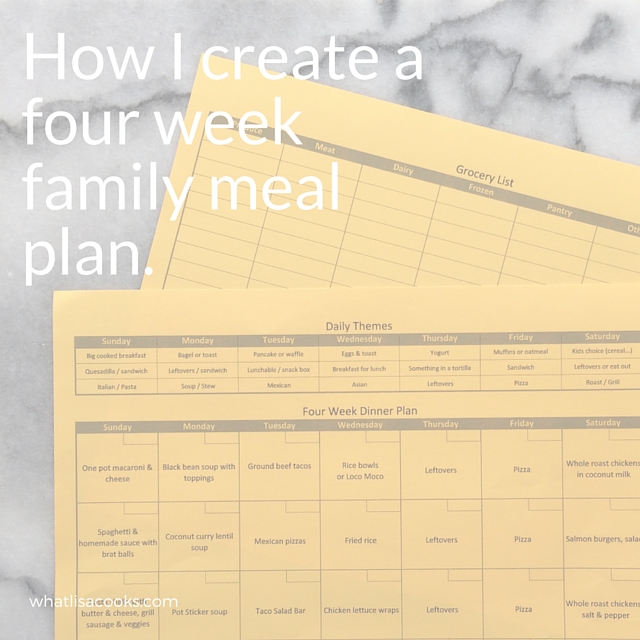
Rather than bore you with all the lengthy explanation in this post, I wrote a whole other post about the why and how of meal planning for four weeks at a time.
You can read all about it here (or click that image over there ==>>)
But for this post, I thought I'd just cut to the chase and get you straight to what's on my plan. This is an easy meal plan for our busy family. Down below I've got a little more detail on some of the dinners, and you'll find my Pinterest board with links to lots of recipe ideas for the things that are on my plan.
And really I didn't mean what I said above about my longer meal planning post being boring. I think it's all pretty useful information and you should totally read it. I don't want you to just copy my meal plan, I want you to feel really good about making your own. So go for it - and be sure to share it with me!
Now, on to this month's plan:
What about the recipes?
Most of my meals are not following recipes. They are just old standards that I know how to cook and I know everybody likes. If you are just getting started with meal planning, or if you just have a super busy life, then I highly recommend that most of the meals you put on your plan be these kinds of meals. Don't make life harder on yourself than necessary. Cook what you know and love.
But when I do need a recipe I consult Pinterest. I think it's the easiest place to look for lots of good options.
I've put together a Pinterest board for you to follow - this is where I will be posting any recipes I am using for the month, as well as a lot of recipes that I will use for just an idea or a guideline, but maybe not follow exactly.
If you want to follow along with my plan, this should give you a good idea of the kinds of things I'm cooking. If you see something on my plan that I haven't pinned a recipe for, please feel free to ask me for one. I'd be happy to help you find one if I can.
A little more detail about some of the meals on this month's plan:
The One Pot Macaroni and Cheese is my own recipe. I haven't done a blog post about it yet, but I'm working on it. I did post it on FB and Instagram though, and I've put a link to that on the Pinterest board. I need to get that recipe actually blogged, I think it might be my masterpiece. ;-)
For ground beef tacos, I actually don't even use taco seasoning most of the time. Just ground beef, browned and seasoned with salt and pepper. Put some meat in a warm corn tortilla and top it with the works. It's simple and wonderful. Also, bonus to keeping it simple - if you brown up a bunch of ground beef and keep the seasoning more generic, then you can use it for another meal. You'll see that I have beef tacos one night, and Asian rice bowls the next night. Simple browned ground beef, reheated with a bit of soy sauce added, makes an awesome addition to a simple rice bowl. But if you really want a taco recipe, I have included a couple of ground beef taco links on my Pinterest board.
Brat balls are my kids favorite. I think we made this name up. Take raw bratwursts, squeeze them out of the casings into small meatball-sized lumps, and simmer in a pot of simple tomato sauce. It couldn't be easier. It only takes about 15 minutes for them to be fully cooked, but if you let it simmer longer than you really get tons of flavor in the sauce. I like to let them simmer for at least an hour if I can. Do this in your slow cooker if you like.
For the enchiladas and Mexican pizzas I make my own sauce. I've just found that even the most mild canned for jarred sauces are too spicy for my kids. With with my homemade sauce they devour it up. I make a big batch and freeze it. I'll share that recipe ASAP, but in the mean time I've posted a similar recipe to my Pinterest board.
The chicken curry I usually make is with a packaged sauce mix. It's one of the very few packaged things I buy. It's an easy weeknight meal. We like a Japanese Golden Curry sauce. You just brown some meat, saute veggies, add the sauce with some broth and coconut milk. It's easy and so good. My secrets: the box says to add water, I use broth and coconut milk instead. And I add a diced up ripe banana. Trust me on this one. It cooks in and dissolves and you'll never know it's there. But it gives a wonderful hint of sweetness and a depth of flavor that you won't be able to identify.
Pot Sticker soup - think of it like Wonton soup, except its a big time shortcut because I'm using store bought pot stickers instead of wontons.
Coconut rice: this is just steamed rice with a can of coconut milk used in place of some of the water. I usually cook a lot of rice - three cups rice and 6 cups liquid. So replace and equal amount of that liquid with a can of coconut milk, and add a little salt.
Salmon burgers are the frozen ones from Costco. Also, a tip: these are great to keep on hand as an easy protein. Crumble one up on your rice bowl, or cut in pieces and put it in your taco or your lettuce wrap.
Let me know if you have any questions!
